Updated on January 27, 2026
Looking for the best treatments and exercises to cure your plantar fasciitis?
If you’re looking for the most current and evidence-based treatments to cure your plantar fasciitis, then you’re in the right place! Plantar fasciitis is one of the most common disorders of the foot that we treat in the clinic. Because of this, we have developed a very simple but very effective treatment program, that we teach our patients, in order to alleviate their aching arches.
Anyone that has experienced plantar fasciitis knows how painful it can be. Not only is it painful, but it can last a long time and be very difficult to get rid of. In fact, some people reading this article may have already attempted various interventions to try and treat it. These interventions may have included expensive shoes, insoles, and orthotics. Or maybe you have been given temporary relief from massages, ice, or ultrasound.
But what everyone really needs is a long-term solution to the daily and debilitating pain on the bottom of their foot. This article will cover all of the treatments, exercises, and equipment we use for our patients in the clinic. If you’re looking to get started right away, then start right now with our Quick Guide on how to treat plantar fasciitis from home, right below.
Disclaimers and Disclosures: All information in this article is for informational and educational purposes only and should not be taken as individual medical advice. Additionally, this article contains affiliate links, meaning when you make a purchase, we make a small commission at no additional cost to you. For more information, see our full Disclaimers and Disclosures.
Quick Guide: Best Exercises to Treat Plantar Fasciitis from Home
1. Gastroc calf stretch on a slant board
- Stretches the big calf muscle (Gastrocnemius) on the back of the lower leg
- Hold this stretch for 20 seconds and repeat 5 times
- Perform this stretch 2 times per day
- Best Slant Board for the gastroc stretch click the link below
2. Soleus calf stretch on a slant board
- Stretches the small calf muscle (Soleus) on the back of the lower leg
- Hold this stretch for 20 seconds and repeat 5 times
- Perform this stretch 2 times per day
- Best Slant Board for the soleus stretch click the link below
3. Marble pick-up with toes
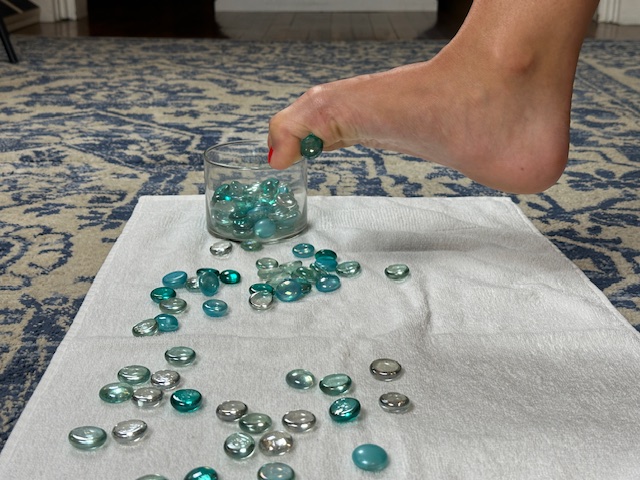
- Works the intrinsic muscles on the bottom of the foot to support the arch
- Pick up marbles one at a time with your toes and place them in a bowl
- Do this for 3 minutes at a time and perform 2 times per day
- Best Marbles for this exercise click the link below
4. Mobilize all of the soft tissue on the bottom of your foot
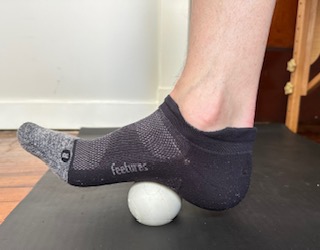
- Works out any knots and adhesions in the plantar fascia
- Roll your foot on a lacrosse ball for 3 minutes
- Do this mobilization 2 times per day
- Best Lacrosse Ball for this mobilization click the link below
5. Keep your plantar fascia from stiffening up over night

- Up to a third of our day is spent sleeping, which is time the plantar fascia can get tight and stiff
- The night splint will maintain the proper length of the plantar fascia and achilles tendon over night
- Wear the night splint each night, while you are sleeping
- Best Night Splint click the link below
6. Treat yourself to some TLC and instant foot pain relief with a massager

- After a long day on your feet or in shoes all day, sometimes you need some short-term relief
- Sit back and relax while the massager does all the work
- Our favorite Foot Massager click the link below
What causes plantar fasciitis?
The plantar fascia is a dense, fibrous connective tissue on the bottom of your foot. It runs from the base of your heel, all the way to the ball of your foot (metatarsal heads). The most important function of the plantar fascia is to provide support to the arch of the foot.
Because of this, anything that overloads the arch of the foot and the plantar fascia can potentially cause plantar fasciitis. Most commonly this condition develops from overuse. Put simply, I tell my patients an overuse disorder means you did something “too much”, “too soon”, or “too fast”. Often this is from starting a new job or a new exercise program and the tissues weren’t ready for the increased demand.
Anything that involves walking, running, jumping, or even just standing too much can increase the demand on the plantar facia. I encourage my patients to think back to the months leading up to the pain and reflect on any changes in these types of activities. Maybe you started running more, or on a different terrain, or moved to a hillier area. Maybe you started a new walking program or exercise routine that included jumping, hopping, or sprints. Or maybe you started a new job that requires you to stand for longer periods of time.
How does this impact treatment?
The first step in treating your plantar fasciitis is being an investigator and making a good guess at the possible cause of the problem. Once you have determined a possible cause, you want to reduce how much you’re doing that activity, or find a modification for it. Possible modifications for people that stand are to use an anti-fatigue mat, using gel inserts in your shoes, or taking little breaks to sit down when you get a chance.
I suggest that my patients significantly reduce or completely eliminate the aggravating activity for at least the first two weeks after starting our treatment program. This will give the plantar fascia a chance to heal and recover, while we start to build those tissues and muscles stronger. Once we have had a chance to get the body used to the new exercises, then we slowly and gradually reintroduce the original activity.
This process may seem long, and can take between 6-12 weeks to completely recover. I know this can feel frustrating and slow in the moment. But I guarantee it’s better than constantly rushing the process, trying to get back to your activity too soon, and still being in pain months or even years down the road. On a final note, don’t forget that body weight significantly impacts the stress on the foot, and a healthy diet may be something to incorporate in the program.
How do I know I have plantar fasciitis?
The diagnosis of plantar fasciitis is relatively straight forward. If you have pain in the arch of your foot or the bottom of your heel when standing or walking, then there’s a good chance you have plantar fasciitis. Often the first steps out of bed on the morning can be quite painful. This is because all of the micro tears in the fascia that healed overnight, are being torn again when you stand up and put tension through that tissue again.
Additionally, a test we do in the clinic will be to pull your big toe back toward you shin bone to stretch the plantar fascia (this is called the Windlass Test). If this causes pain in the arch of your foot or your heel, then this is another indication you have plantar fasciitis. And finally, another test we do in the clinic is to push on a part of you heel called the medial calcaneal tubercle. This is where the plantar fascia connects to the heel bone, and this is almost always painful when you have plantar fasciitis
How do I treat plantar fasciitis from home?
We already described the first step of treating plantar fasciitis. Which is limiting or modifying the activities that aggravate your symptoms. The second step is to stretch out the plantar fascia and the surrounding tissue. Followed by strengthening the muscles that support the plantar fascia and arch of the foot. This second step is then broken into two phases to allow for a progression back to normal, pain-free activity.
The first phase is designed to take load and weight off of the plantar fascia. Then we really focus on stretching out the calf as well as the plantar fascia. The final component of phase one is to strengthen the muscles that support the arch of the foot in a non-weightbearing position.
Phase two is then designed as a progression of phase one and focuses on strengthening the calf and arch in a weightbearing position. This allows for a return to normal activity, while also acting to prevent the return of your symptoms in the future. Both phase one and phase two treatments are described in detail below.
On a final note, we often get questions as to what the best equipment is to treat plantar fasciitis. For convenience, we have included links to the equipment we use with our patients or recommend will help to alleviate your symptoms. We hope you have as much success with them as our patients do!
In-Depth Analysis of the best at home physical therapy exercises and most important equipment for treating plantar fasciitis.
Phase one treatments for plantar fasciitis.
For the best results, the following exercises should be performed 2 times per day, every day of the week. Phase one treatments should last 4 weeks before progressing to phase two.
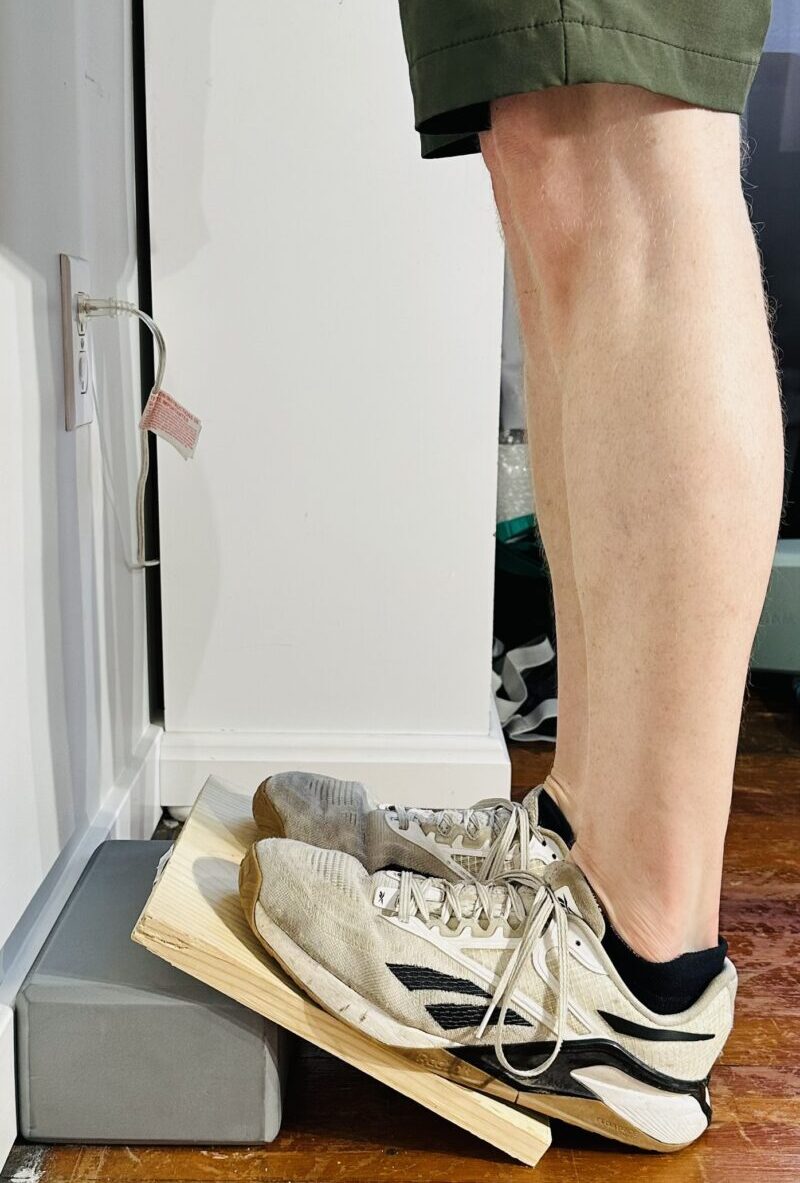
1. Gastroc calf stretch on a slant board
Why the gastroc calf stretch is important for treating plantar fasciitis.
The gastrocnemius (gastroc for short) is the larger of two muscles that insert into your achilles tendon. If either of these two muscles are tight, then it will limit the range of motion of your ankle. This limited ankle motion means more motion is required in the joints of your foot, which then puts more stress on your plantar fascia. Restoring the gastroc to its proper length will reduce the stress on your heel and arch of your foot.
How to perform the gastroc calf stretch on a slant board.
Start by placing the slant board in front of your counter or another stable object you can hold on to. Place both feet on the slant bord with your toes facing forward and your knees nice and straight. Stand tall and then gently lean your whole body forward and keep your heels down on the board the entire time. Once you feel the stretch in the back of your legs, hold it there for 20 seconds and repeat 5 times.
Professional tip: Start with a gentle stretch at a lower incline. Then, as you gain mobility, you can try higher inclines on the slant board.
What is the best equipment for performing the gastroc calf stretch?
Our absolute favorite piece of equipment for performing the calf stretch is the slant board, and we use this with all of our patients in the clinic and it is by far my favorite way to stretch out my own calves. You can do variations of this stretch with a foam roll, against a step, or against a wall when you are in a pinch, but none of them compare to using the slant board.
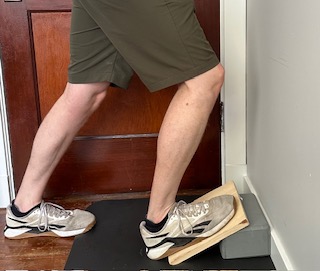
2. Soleus calf stretch on a slant board
Why the soleus stretch is important for treating plantar fasciitis.
The soleus is the smaller of the two calf muscles that insert into the achilles tendon. It sits lower down in the calf and has a greater impact on the ankle when the knee is bent. For the same reasons as the gasroc, tightness in the soleus will reduce ankle motion and increase stress on the plantar fascia.
How to perform the soleus calf stretch on a slant board.
Start by placing the slant board in front of your counter or another stable object you can hold on to. Stand facing the slant board and place just the affected foot on the board with your toes facing forward. Keep your heel on the board the whole time and bend your knee forward so it goes over your toes. Once you feel the stretch, hold it for 20 seconds and repeat 5 times.
Professional tips: You should feel this stretch lower down in the back of your calf. This stretch usually isn’t as intense as the gastroc calf stretch, but it is just as important for treating plantar fasciitis.
What is the best equipment for performing the soleus calf stretch?
Great news! You can use the same slant board you bought for the gastroc calf stretch. It works just as well for this stretch and most people will use the same angle. But feel free to vary it to what feels best for you.
3. Plantar fascia stretch
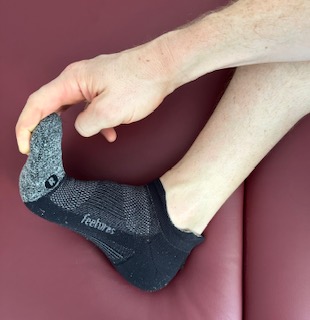
Why the plantar fascia stretch is important for treating plantar fasciitis.
The “-itis” part of the term plantar fasciitis indicates there is inflammation within the structure of the collagen fibers that make up the plantar fascia. When there is inflammation around the collagen fibers, they have a propensity to develop what’s called cross-linking of the collagen bundles. These cross-linked collagen bundles turn into adhesions, which are basically little knots in the connective tissue. By stretching the plantar fascia, it will help to break up these knots and reorganize the collagen fibers into a more uniform structure.
How to perform the plantar fascia stretch.
Start sitting with the leg of your involved foot crossed over your other thigh, so you can grasp your foot. Pull all of your toes back as far as you can toward your shin bone. You should feel a stretch on the bottom of your foot and sometimes into your heel. Hold this stretch for 10 seconds and repeat 10 times.
Professional tips: This is one of the only exercises that directly stretches the plantar fascia and doesn’t require equipment. Those adhesions we were talking about can start to develop pretty quickly. Because of this I will have my patients perform this stretch any time they have been sitting for more than 30 minutes
4. Marble pickup with your toes exercise
Why the marble pickup exercise is important for treating plantar fasciitis.
There are a bunch of small muscles on the bottom of your foot that are collectively called your intrinsic foot muscles. These muscles are designed to support the arch of your foot. The stronger and more active the muscles are, the more stress they take off of the plantar fascia, allowing it to heal. The marble pickup exercise will increase the strength and endurance of the intrinsic foot muscles.
How to perform the marble pickup with your toes exercise.
The name pretty much says it all with this one. Start sitting in a chair and spread out 20-30 marbles and place a bowl within reach of your feet. Grasp one marble at a time with your toes and then deposit the marble in the bowl. Once you have placed all the marbles in the bowl, empty it and start over. Do this exercise for 3 minutes.
Professional tips: Try picking the marbles up with different toes so all of your muscles are getting a workout. Also, sometimes the marbles will get stuck between your toes and part of the workout (and fun) is getting them unstuck without using your hands.
What is the best equipment for performing the marble pickup exercise?
You can just grab your favorite bag of marbles from your old toy chest. But if you don’t want to get toe jam on your childhood memories, then grab our favorites to use in the clinic by clicking the link below.
5. Lacrosse ball roll, mobilize all of the soft tissues on the bottom of your foot.
Why mobilizing the soft tissue is important for treating plantar fasciitis.
Remember those cross-linked collagen bundles and adhesions that develop in the plantar fascia? By performing the lacrosse ball roll you can actually break up those adhesions and reorient the collagen fibers into a uniform structure again. This uniform structure will be stronger and help to prevent your symptoms from returning in the long run.
How to perform the lacrosse ball roll mobilization.
Start sitting and place the arch of your foot on a lacrosse ball. Apply pressure on the lacrosse ball and slowly roll your foot up and down as well as side to side. Work the ball into all of the soft tissues from your heel to the ball of your foot. Do this mobilization for 3 minutes.
Professional tips: Apply firm pressure and move slow and controlled, most people will start with rolling the ball too quickly. I want my patients to take their time and work into all the different layers of fascia and muscle. This mobilization can be uncomfortable, which is normal, but it should also be tolerable.
What is the best equipment for performing the lacrosse ball mobilization?
A lacrosse ball is perfect because it is firm enough to work into the deeper layers of tissue. The rubber also has enough tack to it that it won’t slip out and roll away from you. Another fan favorite for this mobilization is the Supernova. It has the same positive attributes as the lacrosse ball but also has different nubs to work into the tissue at different angles. Both of these are also very good options for other mobilizations throughout your body.
6. Use orthotics, night splints, and massagers for short-term relief.

Why using an orthotic can be helpful in treating plantar fasciitis.
Orthotics are inserts that go in your shoes and can be designed to provide more cushioning, more stability, and/or more arch support. They come in two broad categories, which are custom-made or prefabricated. Custom-made orthotics are designed from a mold of your foot and can take days to weeks to make, and cost hundreds of dollars. Prefabricated orthotics can be bought off the shelf and are usually under a hundred dollars.
The current literature indicates there is not much of a difference between custom-made and prefabricated orthotics and how much it helps plantar fasciitis. Because of this, I usually suggest patients start out with the more cost effective, and easier to get, prefabricated orthotics. You can use any that appeal to you, but I recommend the Dr. Scholl’s gel sport orthotics. They provide a good amount of cushioning, a moderate amount of arch support, and are very reasonably priced at less than $20.
Why using a night splint can be helpful in treating plantar fasciitis.
Night splints are designed to be worn when you sleep and keep your calves and your plantar fascia stretched all night long. This can help prevent your tissues from healing in the shortened position, which will help to limit those painful first steps out of bed in the morning. They also help to facilitate the stretches you have been doing as part of your exercise routine by providing a long duration stretch to the same tissues.
One of the main cons of night splints though, is they can be a bit cumbersome and uncomfortable to wear all night. They come in two main variations, which are hard and soft. Doctors seem to order the hard ones more often, however, they may just not be familiar with the soft variation. My patients seem to have more success and are more likely to be able to wear the soft plantar fasciitis brace while sleeping.
Why using a foot massager can be helpful in treating plantar fasciitis.
Sometimes after a full day of standing, walking, and running around, your feet just need a little TLC. So when you come home and need a little relief, you can just sit back, relax, and let the foot massager do all the work for you! Another nice feature about the foot massager is it has a similar action to the lacrosse ball and will help to break up those pesky adhesions. Now don’t think this will be the sole fix to your foot pain, but the foot massager is our favorite solution to provide short-term relief if your dogs are barking.
Phase two treatments for plantar fasciitis.
Now that you have mastered the first phase of treating your plantar fasciitis from home, it is time to move on to phase two. The purpose of the second phase is to progress to weightbearing exercises in preparation for your return to normal activities. You should continue to perform the phase one exercises once a day, every day of the week. Phase two exercises should be performed once a day, 5-7 days per week.
1. Ankle inversion with a resistance band.

Why the ankle inversion resistance exercise is important for treating plantar fasciitis.
The primary muscle that is responsible for inverting your ankle is the tibialis posterior. This muscle is also responsible for maintaining the arch of your foot. If this muscle is weak, then your arch collapses and your foot overpronates, which puts more stress on your plantar fascia. By strengthening the tibialis posterior, this will reduce the force and tension on the plantar fascia.
How to perform the ankle inversion with a resistance band exercise.
Start sitting with your leg straight and propped on a supportive surface. Have your ankle dangle off the edge so you have freedom of movement at your ankle. Wrap a resistance band around the ball of your foot, just beneath your toes.
Put tension on the band so it pulls your foot out to the side and keep tension on the band. Then pull your foot all the way in toward your big toe and then slowly and controlled, return to the start position. Repeat this 20 times and then rest 30 seconds and then do a second set.
Professional tips: Keep your knee pointed at the ceiling the entire time and make sure all the motion is occurring at your ankle. People have a tendency to rotate their leg in and out. You want the ankle to do all of the work, not your leg turning in and out.
What is the best equipment for performing the ankle inversion exercise?
For this exercise you will want a strap that securely fastens around the ball of your foot, and that you can attach a resistance band to. It is also nice to have bands with different resistances so you can progress as you get stronger. The resistance band set in this link meets all of these criteria, is very similar to what we use in the clinic, and is very reasonably priced!
2. Balance on one leg on a foam pad.
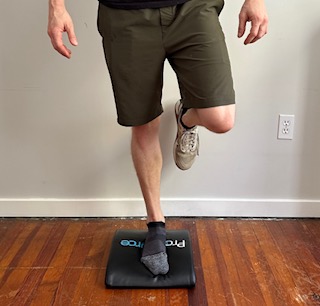
Why the balancing on one leg exercise is important for treating plantar fasciitis.
When we are walking, the average person spends 75-80% of the gait cycle in single limb support. This means there is only one foot in contact with the ground the vast majority of the time spent walking. This increases to 100% of the gait cycle when we are jogging or running. That is a lot of demand being placed on one foot, which explains why walkers and runners are at risk of developing plantar fasciitis.
By performing the single leg stance exercise, you are training all of the tissues of the foot to be ready for the increased demand of weightbearing activities. Additionally, this exercise forces all of the muscles around the ankle and foot to work in concert together in order to stabilize these joints. By performing the exercises on a foam pad, it increases the challenge of the exercise and makes the muscles even stronger. The end result is a stronger and more stable ankle and foot.
How to perform the balancing on one leg with a foam pad exercise.
Start by placing a foam pad in front of your counter or other stable surface. Grab on to the counter with your hands and stand on the foam pad, on one foot. Slowly lift your hands off the counter and balance on your foot for 15 seconds. Then do this on the other leg and repeat 4 times on each side.
Professional tips: It is normal to feel your foot and ankle wobble during this exercise, but you shouldn’t have to touch any surface more than once in a 15 second period. If this exercise is too hard, remove the foam pad and perform it on just the floor until you get better. If it is too easy then try it with your eyes closed (expert level is 30 seconds, eyes closed, on foam!)
What is the best equipment for performing balancing on one leg?
The Airex balance pad is what we have used in our clinic for well over a decade now. It was designed specifically for balance exercises and what most studies have been performed on. It is durable as well as reliable and I would consider it the number one brand trusted by physical therapists for balance exercises.
3. Eccentric heel raise on a step
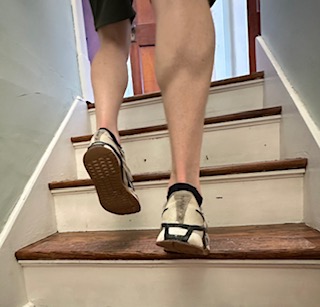
Why the eccentric heel raise is important for treating plantar fasciitis.
The largest and strongest muscle in the lower leg is the calf muscle and it is what allows us to raise our heels off the ground and stand on tippy toes. It is also responsible for controlling the whole body’s forward motion when walking, running, and going upstairs.
By strengthening the calf muscle, it will give you more power as well as more control during these activities. Also, by focusing on the eccentric (lowering) phase of the motion, you will be giving your tissues an additional stretch and helping to increase the tensile strength of the plantar fascia.
How to perform the eccentric heel raise on a step exercise.
Start by placing a small step in front of your counter or other stable surface. Hold on to the counter for balance and then place the front half of both feet on the step, with your heels dangling off the back edge. Raise your heels up so you are standing on tip toes, then lift the good foot off the stair and slowly lower the heel of the bad foot back down.
Each time you lower back down to the start position, place the other foot back on the step and use both feet to raise up to the top position. I always will remind my patients “up with two feet, down with one”. Repeat this 10 times, take a 60 second break, and do two sets.
Professional tips: If you are having difficulty with coordination, or it’s too difficult to perform on the step, just start on ground level. Then, as you get better, you can add the step into the equation. Also, your heel doesn’t have to go all the way to the ground when you’re on the step, just a little below the level of the step will do the trick.
What is the best equipment for performing the eccentric heel raise on a step?
This exercise is best performed with shoes on and on a stepper with good traction. The last thing you need is to slip off your steps in your socks and suffer a different injury! The stepper below has good traction and allows for variable heights so you can use it for other exercises you may need to do.
4. Sidesteps with a resistance band
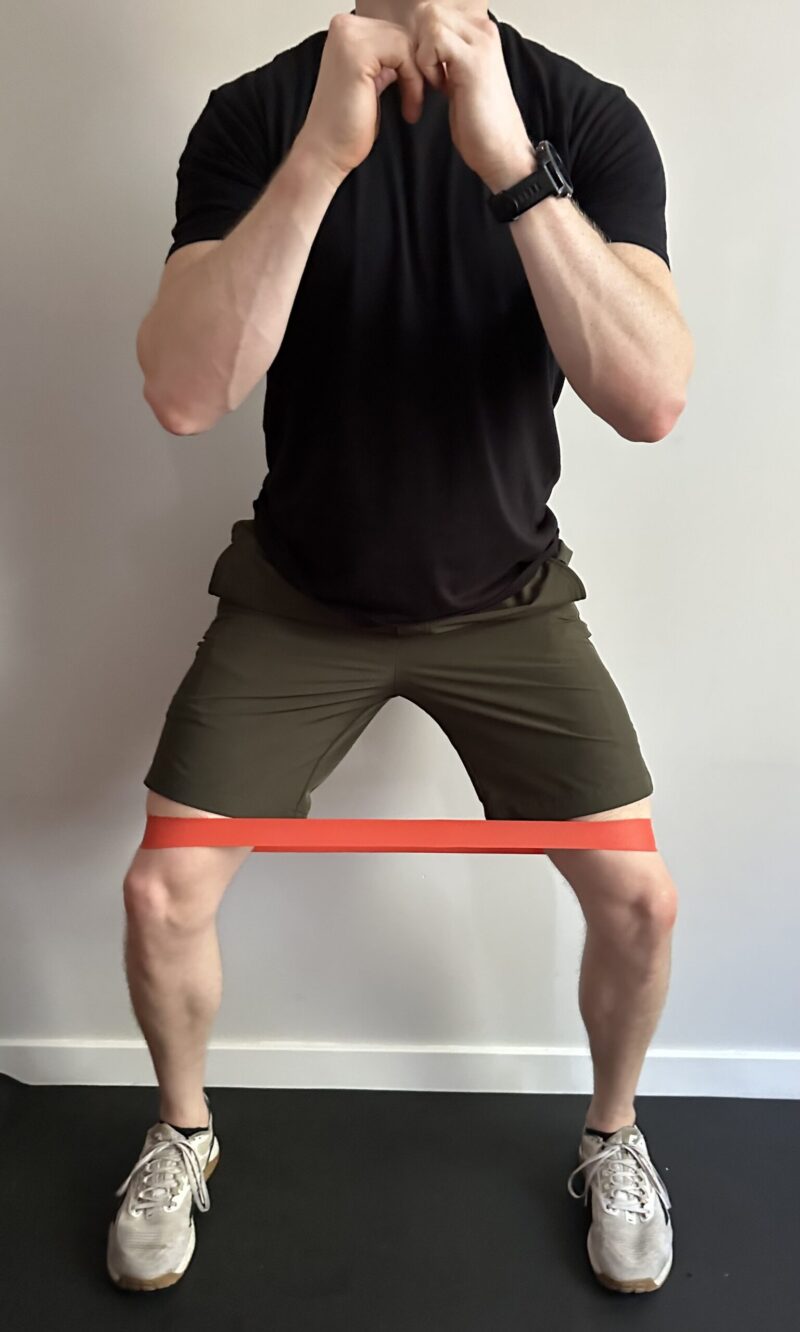
Why the sidesteps with a band exercise is important for treating plantar fasciitis.
So far, we have been focusing on the foot and ankle for our plantar fasciitis treatments. This makes sense because they have the most direct impact on the function of the foot. However, the entire lower extremity works in a synchronous kinematic chain in such a way that the hip can have profound influences on the function of the foot.
Most of my patients that come in with plantar fasciitis also present with weak hip abductors. The abductors, specifically the gluteus medius, are muscles on the outside of your hips. If these muscles are weak or lack the appropriate amount of endurance, it will cause your foot to overpronate and put excess stress on the plantar fascia.
Most people that run, walk, or cycle as their sole form of exercise will have weakness in the hip abductors due to the lack of side-to-side movement. Additionally, if you have to sit for long periods of time in school or at your job, this effectively turns off your glute muscles and you will have weak hip abductors. By strengthening these muscles, you will be adding another layer of protection in developing plantar fasciitis again in the future.
How to perform the sidesteps with a resistance band exercise.
Start by looping a resistance band just above your knees. Place tension on the band by taking a wide step to the side so your feet are beyond hip width apart. Then slightly bend your knees and push them apart so your knees are oriented directly over top of your ankles (like you’re a cowboy that just got off his horse).
Take short, but wide steps to the side, so that you are always keeping tension on the band. Perform 20 steps to one side, then 20 steps back to the start position. Repeat this three times each way, until you feel a good burn in your hips and butt.
Professional tips: Make sure to keep your toes facing forward and your knees out wide. Many people have a tendency to flare their toes and feet out when I tell them to push their knees apart, make sure to keep your feet facing forward.
What is the best equipment for performing the sidesteps with resistance band exercise?
The best resistance bands for this exercise are loop bands. They fit snuggly around the knees and are easy to get on and off. It’s helpful to have a set of these bands with variable resistances so you can use the heavy resistance bands as you get stronger.
The best at home plantar fasciitis treatments, according to a physical therapist concluding thoughts
You have come a long way on your journey to pain-free feet and you now know how to treat plantar fasciitis from home. All of the information may seem overwhelming at first, but it really is quite simple. It’s going to take dedication and it’s never as fast as we want it to be, but follow the exercises outlined above and you will be able to beat your plantar fasciitis!
Now check out our other helpful guides on the foot and ankle:
Frequently Asked Questions About Treating Plantar Fasciitis at Home
Most cases of plantar fasciitis improve within 6–12 weeks when home treatment is performed consistently. This includes modifying aggravating activities, stretching the calf and plantar fascia, and strengthening the muscles that support the arch of the foot. Early improvements often show up as less morning pain or fewer flare-ups during the day, but full tissue recovery takes time. Sticking with the program—even after symptoms start to improve—is key to preventing recurrence.
Mild discomfort during stretching or strengthening is normal, but sharp pain or worsening symptoms are not. A good rule of thumb is that exercises should feel tolerable during the movement and should not cause lingering pain that lasts into the next day. If an exercise consistently increases your heel or arch pain, reduce the intensity, volume, or frequency rather than pushing through it. Pain is information, not something to ignore.
Yes. Excessive walking or prolonged standing—especially on hard surfaces—can overload the plantar fascia and slow healing. Early in recovery, it’s important to temporarily reduce or modify these activities while you build strength and flexibility through rehab. As symptoms improve, walking and standing can be gradually reintroduced in a controlled way to help the tissue adapt without flaring up.
For most people with plantar fasciitis, walking barefoot on hard floors can increase stress on the arch and heel. Wearing supportive shoes or sandals indoors can help reduce strain on the plantar fascia, especially during the early phases of recovery. Once symptoms are well controlled and strength has improved, some people can tolerate short periods of barefoot walking—but it’s not recommended early on.
It’s common for symptoms to fluctuate during recovery, especially as you begin loading the foot more with exercises or daily activities. As tissues adapt to new stress, you may notice temporary soreness or stiffness. This doesn’t necessarily mean you’re doing harm—it often means the tissue is being challenged appropriately. The key is that flare-ups should settle within 24 hours; if they don’t, your program may need adjustment.
If your pain hasn’t improved after 4–6 weeks of consistent home treatment, continues to worsen, or significantly limits your daily activities, it’s a good idea to see a physical therapist. A PT can confirm the diagnosis, address contributing factors like ankle mobility or hip weakness, and tailor a progression plan specific to your needs. Persistent heel pain may also need to be evaluated to rule out other conditions.
Why you can trust Physical Therapy Simplified with the best treatments and exercises for your plantar fasciitis
At Physical Therapy Simplified, our mission is to provide an easily accessible and highly reputable source of physical therapy information that anyone can understand, follow, and benefit from. We want you to feel confident that you are getting the best content and information that will help to reduce your pain and restore you to your highest functional potential.
The author of this article, Andrew Harkins, DPT, has demonstrated expertise in the field of physical therapy and is certified by the American Board of Physical Therapy Specialities as an Orthopedic Clinical Specialist. He has over twelve years of experience as a licensed physical therapist and is an expert in treating conditions related to the foot and ankle.
Andrew has worked as a teaching assistant at the University of Pittsburgh in their Doctor of Physical Therapy Program. Specifically, due to his expertise in treating orthopedic conditions, he assisted in musculoskeletal coursework and provided instruction on biomechanics and rehabilitation programs.