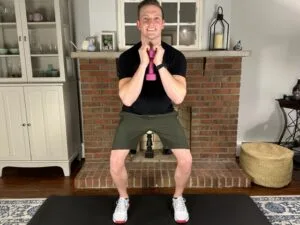
Updated on February 10, 2026
Quick Guide: Best Stretching Exercises for Distal ITB Syndrome
The best stretching exercises for distal ITB syndrome are the hamstring stretch, ITB stretch, piriformis stretch, prone quad stretch, and calf stretch on a slant board. These exercises should be completed twice daily and should not increase your pain or symptoms. This program was created by a Doctor of Physical Therapy who is an Orthopedic Clinical Specialist, make sure to speak to your healthcare provider before initiating a new exercise routine.
1. Hamstring Stretch
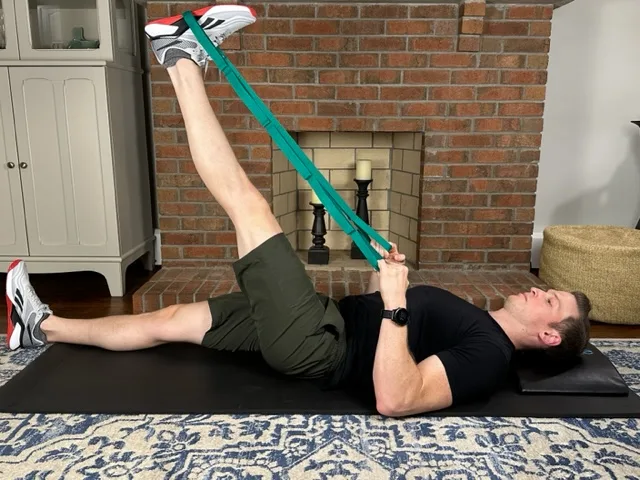
- Stretches the hamstring muscle on the back of your thigh
- Improves flexibility in the muscles behind your knee
- Keep your leg straight and lift off the table with a strap
- Hold this stretch for 20 seconds and repeat 5 times
- Best Stretching Strap in the link below
2. ITB Stretch
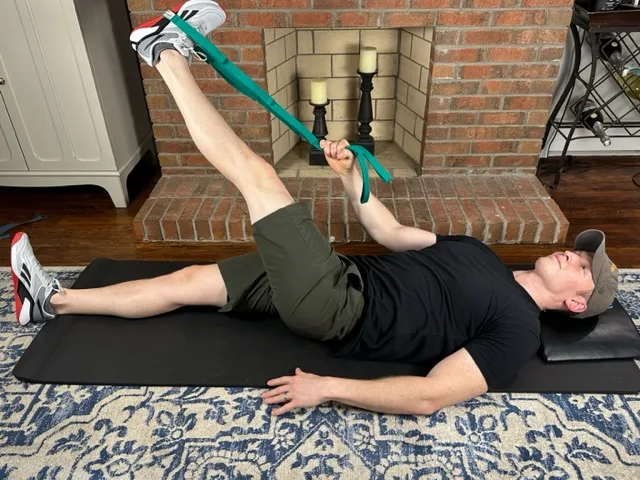
- Stretches the iliotibial band on the outside of your thigh
- Improves flexibility in the ITB and lateral hip muscles
- Keep your leg straight, lift off the table and pull across your body
- Hold this stretch for 15 seconds and repeat 5 times
- Best Stretching Strap in the link below
3. Piriformis Stretch
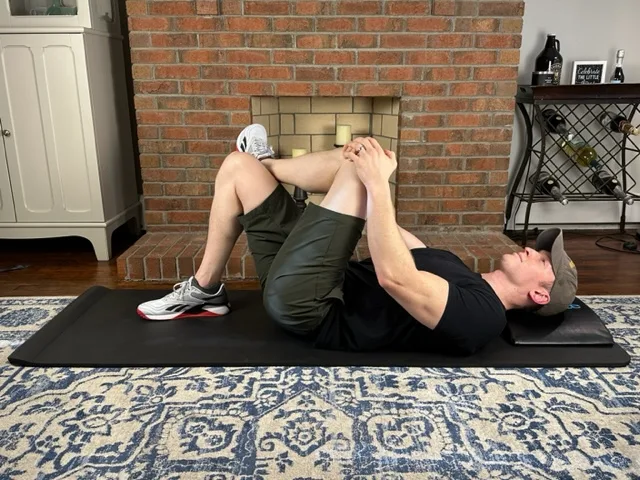
- Stretches the piriformis muscle deep in your buttock
- Improves flexibility of the hip muscles while it is in flexion
- Place your ankle on your opposite knee and pull your knee toward your chest
- Hold this stretch for 15 seconds and repeat 5 times
- Best Yoga Mat in the link below
4. Prone Quad Stretch

- Stretches the quad muscle and vastus lateralis on the front of your thigh
- Important for reducing tension on the IT band from the quad
- Loop a strap around your ankle and pull your heel toward your butt
- Hold this stretch for 10 seconds and repeat 10 times
- Best Stretching Strap in the link below
5. Calf stretch on a slant board
- Stretches the muscle on the back of your lower leg
- Important for reducing tension in your calf muscle
- Keep your foot flat on the board and lean forward to feel a stretch
- Hold this stretch for 20 seconds and repeat 5 times
- Best Slant Board for this stretch in the link below
Bonus: Helpful equipment for reducing pain for distal ITB syndrome; Ice Pack and TENS
- Helps reduce swelling and inflammation in the distal IT band
- Important for reducing pain and improving mobility
- Place TENS pads on the outside of the knee over the painful area, cover with towel, wrap ice around
- Use for 10-15 minutes after exercises.
- Best Ice Packs and TENS Units in the links below
Quick Guide Part 2: Best Strengthening Exercises for Distal IT Band Syndrome
The best strengthening exercises for distal ITB syndrome are the sidelying clams, bridges with a band, sidesteps with a band, and step downs. These exercises should be completed daily and should not increase your pain or symptoms. This program was created by a Doctor of Physical Therapy who is an Orthopedic Clinical Specialist, make sure to speak to your healthcare provider before initiating a new exercise routine.
1. Side-lying Clams
- Strengthens the gluteal muscles on the side of your hip
- Reduces pain by taking pressure off the IT band
- Keep your feet together and push your knees apart against the band
- Hold the knees apart for 3 seconds and repeat 15 times
- Best Resistance Bands in the link below
2. Bridges with a Band
- Strengthens glutes, quads, and hamstrings
- Important for strengthening your hips with the knee in the bent position
- Squeeze your bum, push your knees into the band, and lift your hips off the table
- Hold the top position for 3 seconds and repeat 20 times
- Best Resistance Bands in the link below
3. Sidesteps with a band
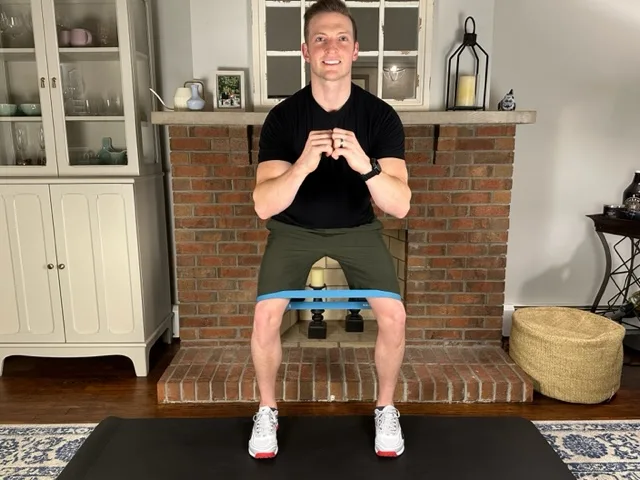
- Strengthens the gluteus medius muscle on the outside of your hips
- Strengthens the muscles that insert into your IT band
- Sidestep in one direction for 15 steps and then return to the start position
- Complete 3 sets until you feel a burn in your outer hips and thighs
- Best Resistance Bands in the link below
4. Step Downs
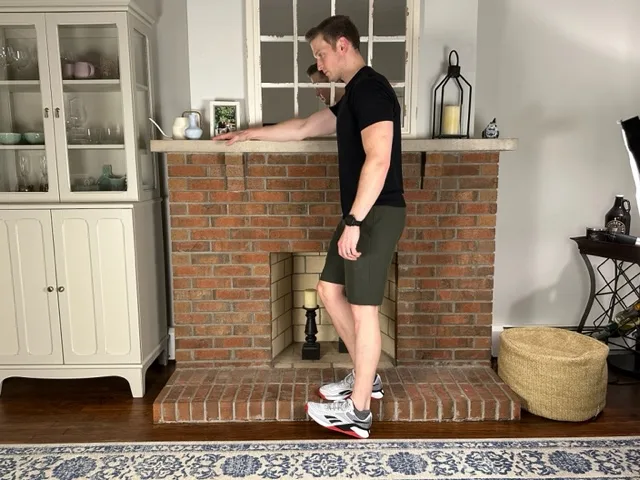
- Strengthens the quad muscle and tendons around the knee
- Improves strength in your quad to make stairs easier and less painful
- Stand on a stepper and bend your knee to touch your other heel to the ground and then stand back up
- Complete 10 repetitions and perform 2 sets
- Best Stepper in the link below
Bonus: Helpful equipment for healing from distal ITB syndrome; Massage Gun
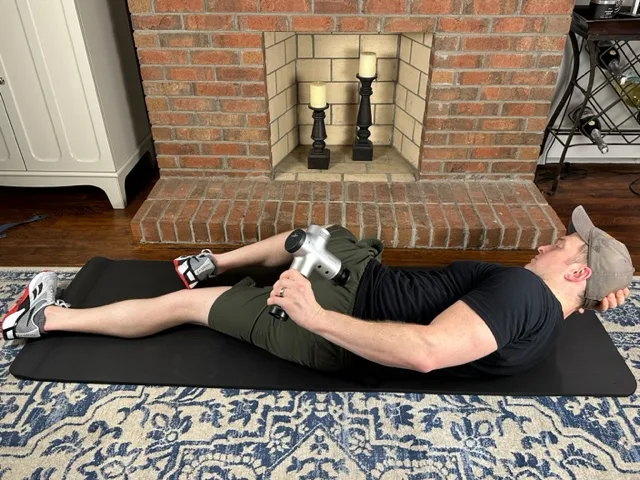
- Helps improve tissue mobility around the distal IT band
- Important for reducing pain and improving mobility
- Use the massage gun on the painful area and surrounding muscles
- Gently use for 5-10 minutes at a time
- Best Massage Gun in the link below
Disclaimers and Disclosures: All information in this article is for informational and educational purposes only and should not be taken as individual medical advice. Additionally, this article contains affiliate links, meaning when you make a purchase, we make a small commission at no additional cost to you. For more information, see our full Disclaimers and Disclosures.
Are you looking for the best exercises to do for distal ITB syndrome of your knee?
If you’re looking to relieve pain and maximize your functional potential with the best exercises for distal ITB syndrome, then you’re in the right place! Distal iliotibial band (ITB) syndrome is a relatively common disorder that causes pain and inflammation on the outside of your knee. A proper physical therapy exercise and stretching routine performed on a daily basis is the most important way you can reduce symptoms and restore function.
As a physical therapist with over 10 years of experience, I have seen many patients with distal IT band syndrome. Because of this, I have created an exercise program specifically designed to address the deficits that are present with this condition. I have included the most important exercises for distal ITB syndrome that I prescribe to my patients, to help reduce their pain and get back to their normal activities.
In this article, I will give you an in-depth description of all the exercises you need to be doing for your ITB syndrome and how to perform them. Additionally, I will provide recommendations for the best equipment that we use in the clinic with all of our patients to help complete each of these exercises. I have broken the exercises into two categories. The first category includes stretching exercises and the second category is comprised of strengthening exercises for ITB syndrome.
If you’re looking to get started right away, then check out our quick guide to the best exercises for distal ITB syndrome directly above, and then scroll later in the article for the in-depth descriptions of how to perform them. Also, many people with distal ITB syndrome can sometimes be confused with knee osteoarthritis or patellofemoral pain syndrome, so make sure you are treating the right one!
Want a quick-reference PDF? Scroll down to the bottom of this post to grab your free printable plan!
Stretching In-Depth Descriptions: What are the best at home physical therapy stretching exercises for distal ITB syndrome?
The best physical therapy stretching exercises for distal ITB syndrome are the hamstring stretch, ITB stretch, piriformis stretch, prone quad stretch, and calf stretch on a slant board. These exercises should be completed twice daily.
1. Hamstring Stretch
How to perform the hamstring stretch with a strap exercise for distal ITB syndrome.
Start by lying on your back with both legs straight and the strap around the middle of your foot. Keep your knee straight and use the strap to pull your leg straight up until you feel a stretch in the back of your leg. Once you feel the stretch, hold it for 20 seconds and then lower back down to the start position. Rest for a second or two and repeat this 5 times.
Professional tip: “Having a slight bend in your knee is ok to start out. But as your body gets used to this stretch, you should work to keep your knee as straight as possible”.
What is the best equipment for the hamstring stretch with a strap exercise?
The Stretch Out Strap is the best option for several reasons. It is 6 feet long and has multiple loops and handles all along its length. This makes it good for people of different sizes and allows you to get the most comfortable grip. It is also very durable and we have had thousands of patients use it in our clinic and most of them end up buying one for their own use at home. The Stretch Out Strap can be found in the link below.
2. ITB Stretch
How to perform the ITB (iliotibial band) stretch with a strap exercise for distal ITB syndrome.
Begin by lying on your back with both knees straight and the strap around the middle of your foot. Keep your knee straight and lift your leg off the table and across your body over your opposite leg. You should feel the stretch on the outside of your hip and possibly down the side of your thigh. Once you feel the stretch, hold this position for 15 seconds and then lower back down to the start position. Rest for a second or two and repeat this 5 times.
Professional tips: “If this exercise is causing groin pain, you can modify your position by lifting your leg higher, lower, or not pulling the leg as far across your body. The key is to feel a stretch on the outside of your hip or thigh without causing pain on the inside of your hip or groin region”.
What is the best equipment for performing the ITB stretch with a strap?
The Stretch Out Strap is also the best option for this stretch as well. It has great utility and can be used for over 20 different stretches that we commonly have patients perform. There is also a version of this strap that is about a foot longer, the Stretch Out Strap XL, and it works well for people taller than 5’10’’. The Stretch Out Strap can be found in the link below.
3. Piriformis Stretch
How to perform the piriformis stretch exercise for distal ITB syndrome.
Begin by lying on your back with both knees bent, and feet flat on the floor or table. Place your ankle of your affected leg across your opposite knee, to make a figure 4 position. Then, pull your knee toward your chest until you feel a stretch in the back of your bum and thigh. Hold this stretch for 15 seconds and then relax back to the start position. Rest for a second or two and repeat this 5 times.
Professional tips: “If the above position is not providing a strong enough stretch, you may reach under your planted leg and pull your thigh towards your chest. Both variations of this stretch are appropriate, feel free to alternate positions to target different areas”.
What is the best equipment for performing the piriformis stretch?
The piriformis stretch requires little to no equipment! However, it is nice to have a firm but soft surface to perform this stretch on. A thick yoga mat is an easy solution to this problem and I use one for my stretches at home. You can easily roll it up and store it in a corner or even throw it in your trunk for when you are traveling. The Yoga Mat can be found in the link below.
4. Prone Quad Stretch
How to perform the prone quad stretch with a strap exercise for distal ITB syndrome.
Start by lying on your stomach and loop the strap around your foot. Gently pull on the strap and bend your knee until you feel a stretch on the front of your thigh and knee. Once you feel the stretch, hold it there for 10 seconds and then relax your leg back to the start position. Perform 10 repetitions.
Professional Tip: “If you need an even better stretch, roll up a thick towel or pillow and place it under your knee and then perform the stretch as described above. You should feel an even stronger stretch on the front of your thigh when you do it like this”.
What is the best strap for the prone quad stretch exercise?
The Stretch Out Strap is the best equipment for performing the prone quad stretch. You can create a lasso by looping one end of the strap through the last loop in the strap. Then tighten the lasso around the middle of your foot before lying on your stomach. This makes it easy to grab onto and it gives you plenty of length and leverage to feel a good stretch on the front of your thigh. The Stretch Out Strap can be found in the link below.
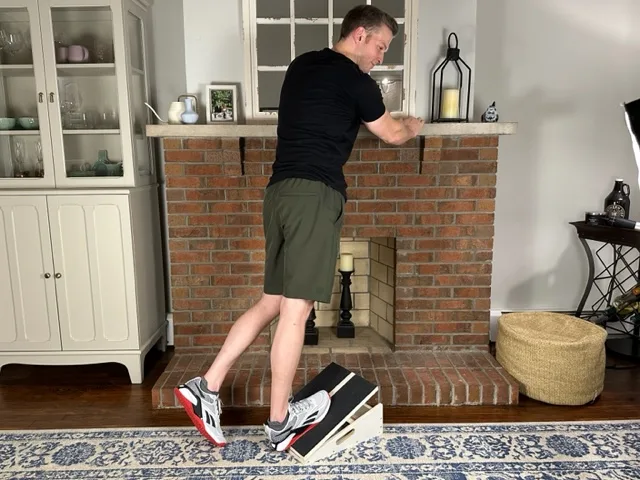
5. Calf Stretch on a Slant Board
How to perform the calf stretch on a slant board exercise for distal ITB syndrome.
Start by placing the slant board in front of your counter or another stable object you can hold on to. Place both feet on the slant bord with your toes facing forward and your knees nice and straight. Stand tall and then gently lean your whole body forward and keep your heels down on the board the entire time. Once you feel the stretch in the back of your legs, hold it there for 20 seconds and repeat 5 times.
Professional tip: “Start with a gentle stretch at a lower incline. Then, as you gain mobility, you can try higher inclines on the slant board”.
What is the best equipment for the calf stretch on a slant board?
My favorite piece of equipment for performing the calf stretch on the slant board is the Professional Wooden Slant Board. This is almost exactly like the slant board we have been using in the clinic with our patients for well over a decade now.
It is adjustable with 5 different angles for calf stretches so you can vary it from 20 degrees all the way to 45 degrees. This allows you to start with a gentle stretch and progress the angle as you gain flexibility. Also, it has anti-slip tread on both the surface as well as the bottom so you can safely perform this stretch without the risk of slipping.
Additionally, it’s made of hardwood plywood which makes it more durable than other slant boards, with up to a 450-pound capacity. Finally, it’s 12”x16” so you don’t have to worry if you have big feet or do this stretch with your shoes one, there will be plenty of room for your feet. The Slant Board can be found in the link below.
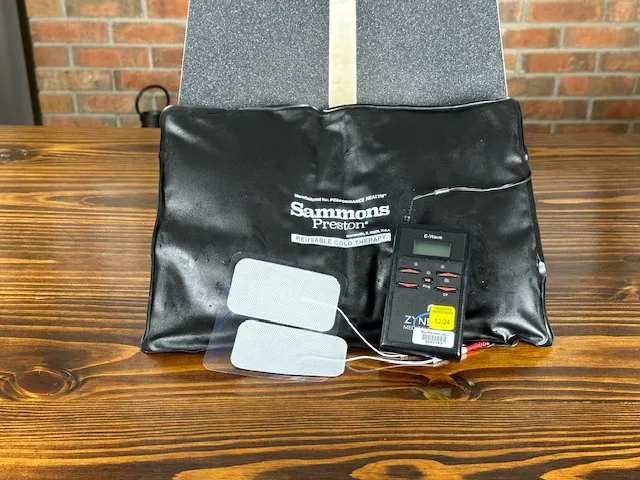
Helpful equipment for distal ITB syndrome: Ice and TENS
How to use Ice and TENS for distal ITB syndrome.
I like to have my patients lie on their back with their leg propped up so the knee is above heart level, this will also help with getting rid of any inflammation. Then I place the pads of the TENS unit on the painful area I then wrap the knee in a pillowcase to place a barrier between the skin and the ice, and then I’ll place one ice pack behind and one on top of the knee so the whole joint is surrounded.
Professional tip: “Turn up the TENS until you feel a comfortable tingling sensation. This isn’t one of those “the stronger the better” scenarios, so only increase the TENS until it is at a very comfortable level for you. Keeping the ice and TENS on for 10-15 minutes at a time seems to be the optimal timeframe for reducing pain and inflammation”.
What is the best ice and TENS for distal Iliotibial Band syndrome?
It’s pretty hard to beat the TENS units we have in the clinic. But considering those units are over $3,000, this portable unit with great reviews for under $50 is an excellent alternative. This unit comes in a travel case, with two channels allowing for 4 electrode placements, and runs on a 9-volt battery. Consider this simple but effective pain relief. The TENS Unit can be found in the link below.
These ice packs are exact replicas of the ones we use in the clinic, and our patients love them! I have had so many patients ask for a recommendation on where they can get the ice packs that we use. They are sick of hard ice packs that don’t conform, or using bags of peas from their freezer that just don’t work as well as they want them to.
These ice packs are large, reusable, and conform to various body parts so you can use them over and over again on any aching joints. I suggest you get a small and a medium so you can wrap your entire knee, front and back. Some people like to get a handful of the ice packs so they can keep one sets in the freezer, nice and cold, while they’re using the other set. The Ice Pack can be found in the link below.
Strengthening In-Depth Descriptions: What are the best at home physical therapy strengthening exercises for distal ITB syndrome?
The best physical therapy strengthening exercises for distal ITB syndrome are the sidelying clams, bridges with a band, sidesteps with a band, and step downs. These exercises should be completed once daily.
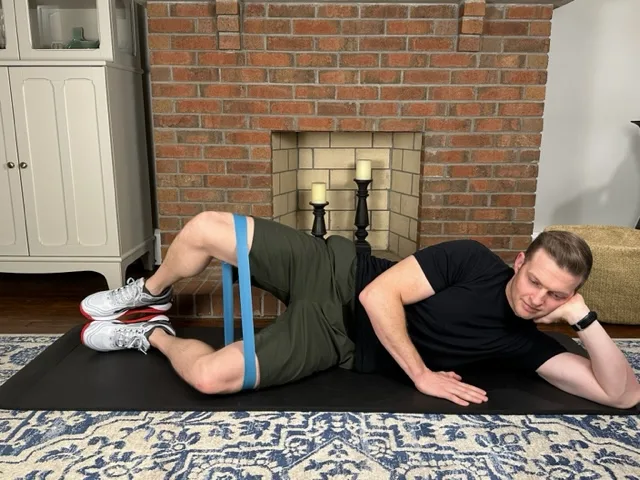
1. Side-lying Clams
How to perform the side-lying clams exercise for distal ITB syndrome.
Begin lying on your side with the affected (hurting) leg facing the ceiling and both knees bent. Keep your feet together and lift the top knee toward the ceiling, pause for 3 seconds and then return to the starting position. Perform 10 repetitions, take a 30 second break, and repeat for 2 sets.
Once this exercise begins to feel too easy, add a resistance band around your knees to increase the challenge. The addition of a resistance band will help to improve your gluteus medius strength quicker.
Professional tip: “When you are lifting the top leg, make sure to keep your hips in place and avoid opening the legs so far that you rock backwards. The goal is to feel the burn and fatigue on the outer side of the hip and bum”.
What is the best equipment for performing the side-lying clams?
A loop resistance band is the easiest way to increase the effectiveness of this exercise. You can simply slide the band over your feet and move it up to position it just above your knees. The band increases the amount of muscle recruitment, which will make your hips and butt stronger. The Loop Resistance Bands can be found in the link below.
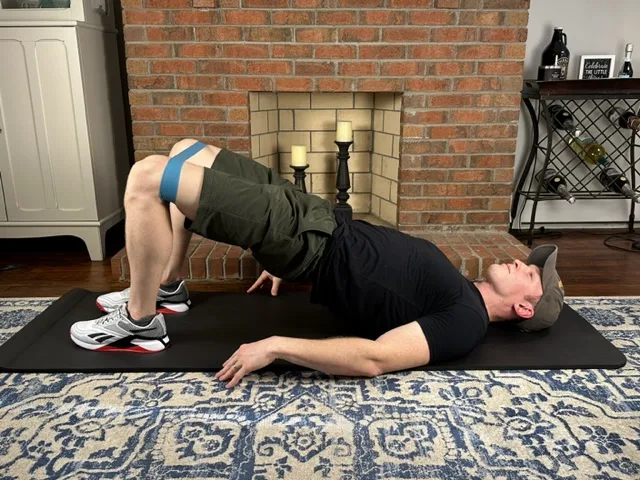
2. Bridges with a Band
How to perform the bridge with a band exercise for distal ITB syndrome.
Begin lying on your back with both knees bent and feet planted on the table or floor. Lift your hips toward the ceiling and squeeze your bum at the top position. Hold this position for 3 seconds and then lower back down to the start. Perform 10 repetitions, take a 30 second break, and repeat for 2 sets.
Professional tip: “It is normal to feel this exercise in your back, butt, hamstrings, and even quads. However, we want the primary mover to be your buttock, so make sure to ‘squeeze your cheeks’ in that top position”.
“Once you have become accustomed to this exercise after about a week, you can add a resistance band to increase the difficulty. Place the band just around your knees and as you lift your hips off the table, gently push your knees apart to create a bit of tension on the band”.
What is the best equipment for performing the bridge with a band.
The same loop resistance bands we used for the clams exercise can be used for the bridges as well. Having a few of these bands with variable resistances is great because you can change and add resistance as you gain strength every couple of weeks. A progressive overload to the tendon and muscle is the best way to get it ready to return to higher level activities. The Loop Resistance Bands can be found in the link below.
3. Sidesteps with a Band
How to perform the sidesteps with a band exercise for distal ITB syndrome.
Start by standing with a resistance band looped around your thighs, just above your knees. Bend your knees slightly so you are in a mini squat position and press your knees apart, so you are always keeping tension on the band. Make sure to keep your toes pointed forward and slowly step sideways, always keeping a space between your feet.
Take 15 steps in one direction, stay facing the same way, and then take 15 steps back to the start position. Take a 15 second break and repeat 3 times.
Professional Tip: “This exercise is designed to make you feel a bit of a burn in your hips, thighs, and buttock. Start with a light resistance band and once you can get through all 3 sets with relative ease, it’s time to increase the tension of the resistance band”.
What is the best equipment for performing the sidesteps with a band exercise?
The best equipment for the sidesteps with a band exercise is a set of loop resistance bands that are easy to put on and take off. You will want a set of these bands so you can start with low resistance and slowly increase the tension of the band as you get stronger. The Loop Resistance Bands can be found in the link below.
4. Step-Downs
How to perform the step-down exercise for distal ITB syndrome.
Start by placing a small step next to your counter or other stable surface. Hold on to the counter and stand on the stepper with your affected leg. Slowly bend your knee and lower the opposite heel to the ground. I like to tell my patients, “pretend there is a potato chip on the ground that you want to touch with your heel, but not crack”. Then stand back up to the start position. Repeat 10 times, take a 30 second break, and complete 2 sets.
Professional tips: “Start with a 4-inch step height when you begin this exercise. Once you can perform all the repetitions without pain and with relative ease, increase the step height by 2 inches. A normal height step is 8 inches, so I have my patients work toward this goal”.
“This exercise is a lot more difficult than it looks, especially on a bum knee. It is also typically a little bit uncomfortable to do when you have knee pain. So, I recommend trying to keep your pain levels below a 2-3/10 when you are doing this exercise and progressing slowly”.
What is the best stepper for performing the step-down exercise?
For the step-down exercise, you will want a stepper that is adjustable and that has good traction. The stepper below is nonslip and allows for variable heights so you can progress as your symptoms permit. This stepper is great because of its versality and the number of exercises you can do on it. We have hundreds of patients do dozens of different exercises on them, so they come in pretty handy. The Stepper can be found in the link below.
Looking for a simple way to stay consistent?
👉 Download the full At-Home Distal ITB Syndrome Exercise Program + Exercise Tracker (PDF) to follow and log your daily progress.
Frequently Asked Questions About Distal ITB Syndrome Exercises
Activities that involve repeated knee motion, such as downhill running, long cycling sessions, hiking on uneven terrain, or frequent stair climbing, tend to aggravate symptoms because they increase friction between the IT band and the bony structures on the outside of the knee.
Distal ITB syndrome usually causes pain on the outside of the knee that worsens with repetitive knee bending, such as running or cycling. People often describe aching, burning, or tenderness over the lateral knee that may begin only after activity and become sharper with continued movement.
Pain with distal ITB syndrome often starts after repetitive knee flexion and extension. Early on, symptoms may diminish after warming up but gradually worsen during longer or more intense activity. This pattern is due to friction where the IT band crosses over the lateral femoral epicondyle as the knee bends and straightens.
Yes —or at the very least reducing or modifying activities that worsen symptoms is an important part of recovery. Rest helps decrease inflammation while gentle mobility, stretching, and strength training can improve flexibility and muscle balance around the IT band to support healing.
Avoid sudden increases in activity intensity or duration, frequent downhill or slope running, training on uneven surfaces, and high‑impact knee bending exercises. These movements can exacerbate irritation and inflammation of the IT band and surrounding structures.
You should see a healthcare provider if your pain persists despite consistent exercise and activity modification, if swelling or tenderness increases, or if the pain interferes with daily activities. A professional evaluation ensures the diagnosis is correct and other knee conditions are ruled out.
Best Exercises for Distal ITB Syndrome Final Thoughts
Having distal ITB syndrome can be painful, annoying, and truly limit your functional ability. I have seen firsthand how this can negatively impact people’s lives. This is the reason I created the exercise program above. I have helped many patients use this program to successfully treat their ITB syndrome.
The trick is to be diligent with your exercise routine and perform it consistently every day. In a matter of a few weeks or months, I have faith you will be back to all the activities you love to do, and hopefully pain-free!
Why trust Physical Therapy Simplified for exercises for distal ITB syndrome?
At Physical Therapy Simplified, our mission is to provide an easily accessible and highly reputable source of physical therapy information that anyone can understand, follow, and benefit from. We want you to feel confident that you are getting the best content and information that will help to reduce your pain and restore you to your highest functional potential.
The author of this article, Andrew Harkins, DPT, has demonstrated expertise in the field of physical therapy and is certified by the American Board of Physical Therapy Specialities as an Orthopedic Clinical Specialist. He has over ten years experience as a licensed physical therapist and is an expert in treating conditions related to the knee.
Andrew has worked as a teaching assistant at the University of Pittsburgh in their Doctor of Physical Therapy Program. Specifically, due to his expertise in treating knee conditions, he assisted in musculoskeletal coursework and provided instruction on how to treat patients with knee pain.