Updated on February 5, 2026
Quick Guide: 9 Best Exercises for Ankle Instability
1. Ankle Band – 4 Way
- Strengthens the muscles on all sides surrounding the ankle joint
- Holding the band in one direction, move the foot in the opposite direction against the resistance of the band 20 times
- Repeat this in all four directions; anchoring the band towards you, away from you and to each side of the foot, always pulling the foot and ankle away from the band
- See below for further instruction of all four directions
- Best Resistance Band Set in the link below
2. Marble Pick-Up

- Strengthens the intrinsic foot muscles deep in the arch of your foot
- Using your toes pick up one marble at a time and place them in a separate pile or bowl
- Repeat this for 2 minutes and perform once per day
- Best Marble Set in the link below
3. Heel Raises
- Strengthens the calf muscles (gastrocnemius and soleus) in the back of your lower leg
- Keeping your knees straight, raise up onto the balls of your feet, then slowly return back to the ground
- Repeat this exercise 10 times and perform 2 sets, once per day
4. Sidestepping with Resistance Band

- Strengthens the outer hip (gluteus medius) muscles that support the lower extremity with lateral movements
- With the resistance band around your thighs sidestep the length of your room or hallway and then sidestep back to the starting position
- Repeat this exercise 2-3 times depending on the size of your space, once per day
- Best Loop Resistance Band Kit in the link below
5. Single Leg Stance

- Improves the endurance, motor control and proprioception of the lower leg muscles to build stability and balance in the ankle
- With a slight bend in the knee stand on one leg for 15 seconds
- Repeat this exercise 5 times and perform once per day
6. Single Leg Stance on Foam
- Improves the endurance, motor control and proprioception of the lower leg muscle to build stability and balance in the ankle further with the addition of standing on an unstable surface
- With a slight bend in your knee, stand on the foam pad on one leg for 15 seconds
- Repeat this exercise 5 times and perform once per day
- Best Foam Pad in the link below
7. Step and Hold
- Improves dynamic balance and stability in the ankle and lower leg
- Step onto the affected foot with a slight bend in the knee, hold this position for 5 seconds
- Repeat this exercise 15 times and perform once per day
- If this exercise becomes easy, you may progress to stepping onto a foam pad
- Best Foam Pad in the link below
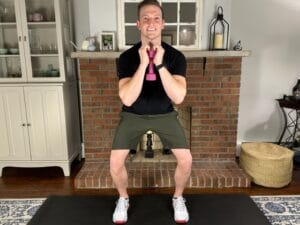
8. Romanian Dead Lift (RDL)
- Improves dynamic balance and stability in the ankle, hip and lower leg
- Standing on one leg with a weight in the opposite hand, slowly hinge at the hips and lower the hand with the weight towards the ground as the opposite leg extends behind
- Complete 2 sets and perform once per day
- Best Dumbbell Weight Set
9. Steamboats
- Improves static balance with an external resistance and improves hip strength and endurance
- With the resistance band around your unaffected ankle and standing on the affected (hurting) ankle, pull the leg in the opposite direction of where the band is anchored
- You will repeat this exercise in four directions turning your body a quarter turn for each direction; facing the band, with the band to your left, back to the band and with the band to your right.
- Repeat this movement quickly 20 times and perform once per day
- Best Resistance Band Set in the link below
Disclaimers and Disclosures: All information in this article is for informational and educational purposes only and should not be taken as individual medical advice. Additionally, this article contains affiliate links, meaning when you make a purchase, we make a small commission at no additional cost to you. For more information, see our full Disclaimers and Disclosures.
Are you looking for the best exercises to treat your ankle instability?
Ankle instability, often caused by laxity or weakness in the ankle joint can be a frustrating condition that impedes your normal daily activities or even sports participation. However, ankle instability is a common condition we treat in physical therapy all the time.
Below you will find a guide on exercises that we give our patients and have found to be helpful in improving the support, strength and pain in the ankle. These exercises are broken down into two categories; one with a focus on strengthening and the second with a focus on balance. We have found a combination of strengthening and balance exercises are most effective in improving your ankle pain and function quickly.
We included a quick guide of the exercises and equipment we use and recommend to our patients with ankle instability above. This quick guide is designed to give a brief overview of the exercises for those of you hoping to jump right in and get started! Following the quick guide, below, we will delve further into the details of how to perform the exercises, the purpose of the exercises and some tips we find helpful when working with our patients!
Sometimes, ankle instability can lead to or exacerbate other conditions such as plantar faciitis or a big toe bunion. If you happen to be struggling with either of these, make sure to check out our definitive guides on how to treat plantar fasciitis from home as well as our remedies and preventions for bunions.
In-Depth Descriptions: What are the best at home physical therapy strengthening exercises for ankle instability?
When we are treating ankle instability, it is important to build strength in all the muscles that surround the ankle joint, as well as in the smaller muscles of the foot that lend support to the ankle. The four best exercises to lay a strong foundation of strength in the foot and ankle are the ankle 4-way with resistance band, marble pick-up, heel raises and sidestepping with a resistance band. These exercises should be performed once per day, every day for six weeks or until your symptoms begin to improve.
1. Ankle 4-Way with Resistance Band
This exercise includes four movements to target muscles on each side of your ankle. The directions include plantarflexion, dorsiflexion, inversion and eversion of the ankle.
1a. Plantarflexion with Resistance Band
How to perform the plantarflexion with resistance band exercise for ankle instability.
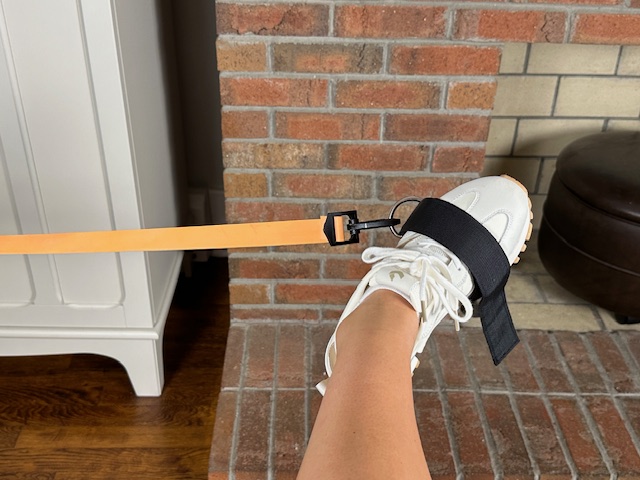
First begin by looping the Velcro strap or loop of the band around the ball of your foot. Next you will pull the band directly towards yourself and hold this position. Then then point your toe in the opposite direction towards the ground. This exercise is working to strengthen the gastrocnemius or calf muscle in the back of your leg.
1b. Dorsiflexion with Resistance Band
How to perform dorsiflexion with resistance band for ankle instability.
For this exercise, you will loop the band or strap around your foot and pulled in the opposite direction of the last exercise. You may need a buddy for this exercise to help you hold the band in the opposite direction from you. Alternately you could anchor the band to the ground using a weight or tie it to a stationary object if you don’t have a helping hand nearby. With this exercise, you will pull the foot towards yourself to strengthen the anterior tibialis or the muscle in the front of your shin.
1c. Inversion with Resistance Band
How to perform inversion with resistance band exercise for ankle instability.
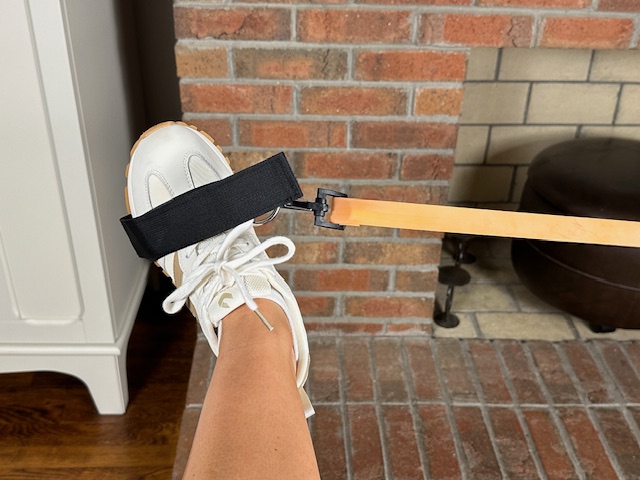
You will loop the band around the foot, so that the tension is being pulled towards the outside of the foot or laterally away from the other foot. Again, this exercise might be easier with the help of a friend to hold the band for you. To perform this exercise, you will turn the foot inwards towards your opposite foot. This exercise is strengthening the posterior tibialis muscle, which is an important muscle on the medial side (inside) of your ankle.
1d. Eversion with Resistance Band
How to perform eversion with resistance band exercise for ankle instability.
This exercise can be done by placing the loop around your affected foot and anchoring the other end of the band around your unaffected foot. Once you are in position, move the foot outward or away from the opposite foot. The goal of this exercise is to strengthen peroneal muscle group or the muscles on the outside of your ankle.
For this exercise, you will loop the band or strap around your foot and pulled in the opposite direction of the last exercise. You may need a buddy for this exercise to help you hold the band in the opposite direction from you. Alternately you could anchor the band to the ground using a weight or tie it to a stationary object if you don’t have a helping hand nearby. With this exercise, you will pull the foot towards yourself to strengthen the anterior tibialis or the muscle in the front of your shin.
Professional Tip: When performing the ankle exercises with the resistance band, it is important to keep the leg in place and as still as you can, moving only the foot and ankle. This ensures that the muscles surrounding the ankle joint are doing the work and the muscles of the hip or leg are not helping.
Best equipment for performing the ankle 4-way with resistance band
We love this resistance band kit for these exercises. This kit is great because it comes with a Velcro strap so you can adjust to any foot size and ensure the band is snug and where you want it to perform the exercise. We also love this set because it comes with a variety of different tensions, allowing you to progress to higher resistance as the exercise gets easier and as your ankle gets stronger. The recommended band kit can be found in the link below.
2. Marble Pick-Up
How to perform the marble pick-up exercise for ankle instability
This exercise is fairly simple! We recommend you perform this exercise sitting in a chair with the marbles spread out on a towel on the floor in front of you. Next, begin picking up the marbles with your toes one marble at a time by crunching or curling your toes towards you. Then place the marble in a cup or container to separate it from the rest.
We encourage our patients to use a variety of toes for this exercise in order to target all the tiny muscles deep in the arch of your foot. The key is to only pick up one marble at a time to ensure you are getting enough repetitions. Depending on how many marbles you have, you can complete this once with each marble or set a timer for two to three minutes, to ensure you are getting enough repetitions to really challenge your foot muscles. The goal of this exercise is to strengthen and improve the endurance of our deep intrinsic foot muscles.
Professional Tip: the key is to pick the marbles up using a crunching motion with the marble settled snugly between your toes and the pad of the ball of your foot. We want to avoid picking up the marbles between the toes, as this is working a different set of muscles!
Best Equipment for Performing the Marble Pick-Up
For this exercise you may use any old marbles you have lying around the house. If you find you have gotten rid of your old marble set, we recommend this set from amazon, because of the size of the marbles is perfect for the toes and the amount that comes in each pack allows for many repetitions before needing to reset your set up. Also, they come in a few fun color options to make the exercise more fun for you. The recommended marble set can be found in the link below.
3. Heel Raises
How to perform the heel raise exercise for ankle instability
Begin by standing next to a stable service in case you would like to hold on for balance. Place the feet slightly narrower than shoulder width apart, keep the knees straight and raise up onto the balls of your feet. Pause for a moment in the top position, then return back to the ground. We are working to strengthen our calf muscles with this exercise.
Professional Tip: Ensure you are performing this exercise at an appropriate speed. I usually recommend two seconds to get to the top position, then two seconds to return to the ground.
4. Sidestepping with a Resistance Band
How to perform the sidestepping with a resistance band exercise for ankle instability
We recommend performing this in an area where you have a longer hallway or open space. Begin by placing a band around the thighs a few inches above your knees. Next, bend the knees so you are in a mini squat position. Staying in this position the whole time, begin by stepping laterally (sideways), several times until you make it to the end of your space.
Once you reach the end of your space you will stay facing the same direction and sidestep back to the starting place. Repeat this three to four times depending on the size of your space and how you feel after one full lap. The goal is to feel the burn in your muscles, but not too tired or painful to complete a few repetitions. We are working to strengthen our lateral ankle muscles, as well as our outer hip muscles with this exercise.
Professional Tip: The key to getting the maximum benefit from this exercise is to keep tension on the band while you are stepping. You can do this by not bringing your feet completely back together with each step. This helps to keep your glutes and lateral ankle muscles engaged and working for several repetitions before giving them a chance to rest.
Best equipment for sidestepping with resistance band
We love this band kit! It is easy to get on and off and comes with a variety of different resistances. Having a set with a few different resistances is nice to allow you to progress to the next level if the exercise is getting easy. These bands are also great for many of our recommended exercises so you get good bang for your buck, not to mention the fun color choices. The recommended band kit can be found in the link below.
In-Depth Descriptions: What are the best at home physical therapy balance exercises for ankle instability?
Balance exercises are equally important and complement the strengthening exercises for ankle instability. Balance exercises help to build endurance in the muscles that surround the ankle joint, as well as retrain the motor patterns associated with certain activities. Balance is essential in ankle rehab because it works to improve the stability and control of the ankle joint in a variety of settings.
Below we include exercises to work on static balance as well as dynamic balance to help the ankle improve stability and control with many different movements. This is important to try to mimic activities that you may be doing in your daily life, such as walking on grass, standing on one leg to reach for something or going on a hike with rocky terrain. If you can master these balance exercises, it will decrease the risk of re-injury in similar scenarios in your everyday life.
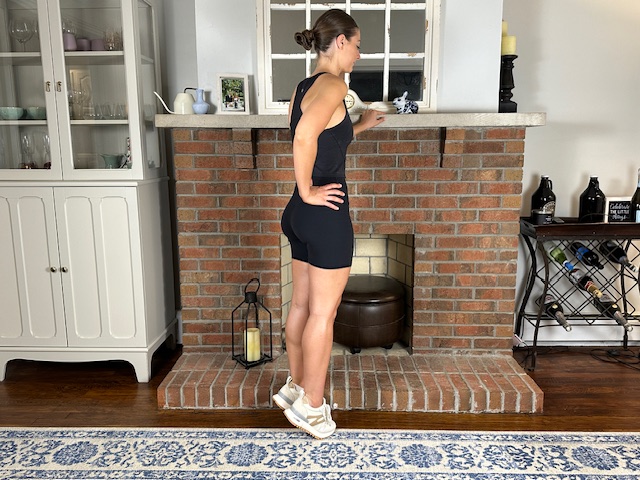
1. Single Leg Stance
How to perform the single leg stance exercise for ankle instability
Begin by standing next to your counter or a stable surface. Stand with your affected or hurting leg slightly bent and lift the good leg off the ground, so you are standing on one foot. Begin by holding on to the counter for support and when you feel ready you may let go. Hold this position for 15 seconds and repeat 5 times.
Professional Tip: If you are able, try to keep the good leg from touching or resting on the affected leg as it is lifted. This makes the exercise a little more challenging so you are only depending on the hurting or affected side to maintain your balance.
Further, if performing the single leg stance without holding on is too challenging, you may begin with holding onto the counter with both hands. Then, progress to one hand, then fingertips, until you are able to perform this exercise without using your hands for balance.
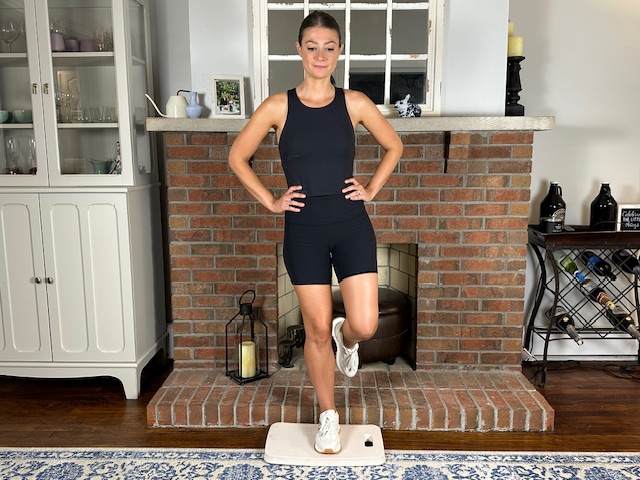
2. Single Leg Stance on Foam
How to perform the single leg stance on foam exercise for ankle instability
This is very similar to single leg stance on the ground, but with this exercise you will stand on one foot on top of a foam pad. The same principles apply to this exercise as the single leg stance, but the challenge increases as you are now standing on an unstable surface. Because this exercise is a little more challenging, I also recommend standing by a stable countertop or surface for support in case you need it.
First, begin by stepping both feet up onto the foam pad holding onto the counter for support. When you feel comfortable and have acclimated to the new surface, lift the good foot off the ground so you are only standing on one foot (the hurting side). Keep a slight bend in the standing knee to put the demand fully on the muscles of the foot and ankle.
Professional Tip: Just as we advised with the single leg stance, try to keep the unaffected leg from resting on the affected or hurting leg. Further, you may do the same progression of upper extremity support with this exercise as you did with the single leg stance on the ground. First beginning with both hands, then one hand, then fingertips and finally no hands! Because this exercise is more challenging, you may need a little more help from the hands starting out.
Best equipment for single leg stance on foam pad
For this exercise we love this Airex Foam Pad. This pad is the one we use time and time again in the clinic because it is durable, dense enough to challenge the balance and lasts a long time. We have found this pad really provides the best challenge for the muscles of the lower leg and foot. Also, a bonus is this pad is small, easy to store and portable! However, we know this pad is a little pricey, so a pillow can also be used if the foam pad is not in your budget! The Airex Foam Pad can be found in the link below.
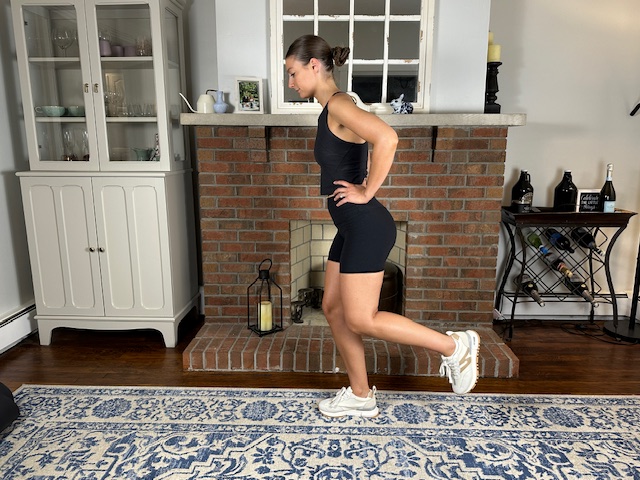
3. Step and Hold
How to perform the step and hold exercise for ankle instability
Begin by standing next to a counter for support in case you need it to help maintain your balance. Next, step onto the affected or hurting ankle and quickly coming off your other leg. When landing on the affected side, keep the standing leg slightly bent to challenge your balance. Hold this position for about 5 seconds then return to your starting position.
Professional Tip: You may start this exercise by holding onto the countertop with one hand and as your balance improves reducing the amount of support from your hands. We also recommend starting this exercise by quickly stepping onto the affected side, but as this becomes easier you may try a light hop onto this foot as a progression.
Best equipment for step and hold
No equipment is needed for the step and hold. However, if this exercise becomes easy, you can increase the difficulty by stepping onto a foam pad. Below we linked the same foam pad as we use with our single leg stance exercise, because we have found it to be the best! The Airex Foam Pad can be found in the link below.
4. Romanian Deadlift (RDL)
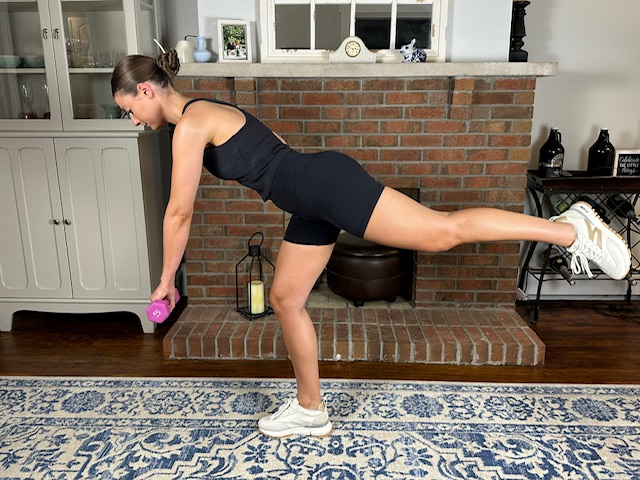
How to perform the Romanian deadlift (RDL) exercise for ankle instability
Start by standing on your hurting or affected leg with a slight bend in your knee. From here you will lift your other leg off the ground. Next, you will hinge at the hips reaching with the opposite hand from your standing leg towards the ground. You can reach towards a cone or object on the ground as a target, then return to your starting position.
Professional Tip: The key with this exercise is to hinge at the hips rather than performing a squatting movement. I always tell my patients to pretend like they are tipping over like a tea pot! As this exercise becomes easier you can progress to holding a weight or kettlebell in your reaching hand. Adding a weight makes this exercise a little harder to maintain your balance and gives an extra boost to strengthen the muscles of the leg and glutes.
Best Equipment for the Romanian Deadlift (RDL)
No equipment is needed for this exercise, but ensure you have lots of space around you so you are able to move freely! A progression of this exercise is to add a hand weight or kettlebell, so below I have linked my favorite set of light hand weights we use all the time that come in a variety of sizes and are comfortable to grip. The recommended weight set can be found in the link below.
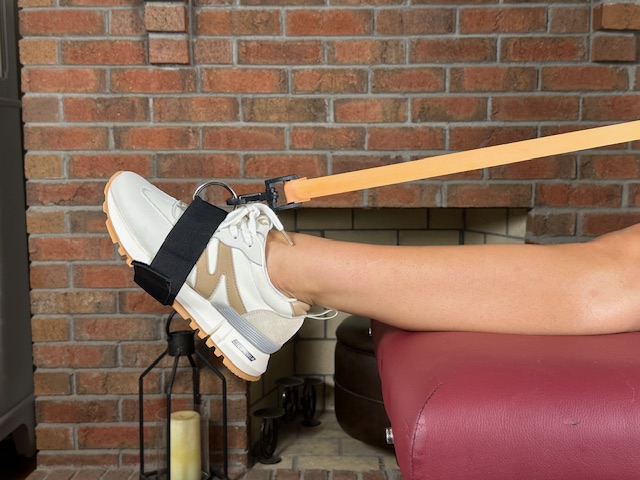
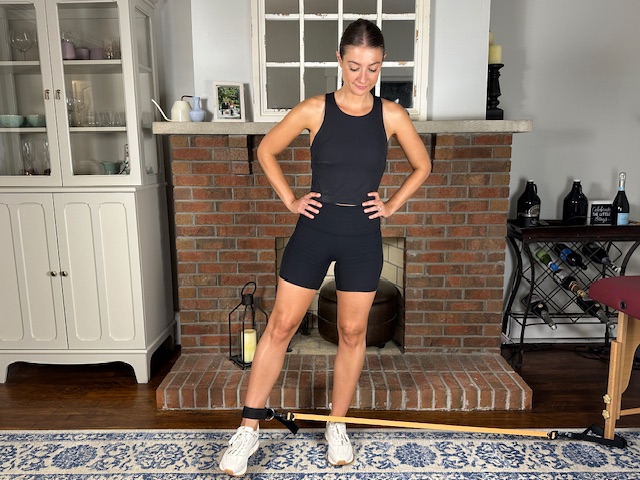
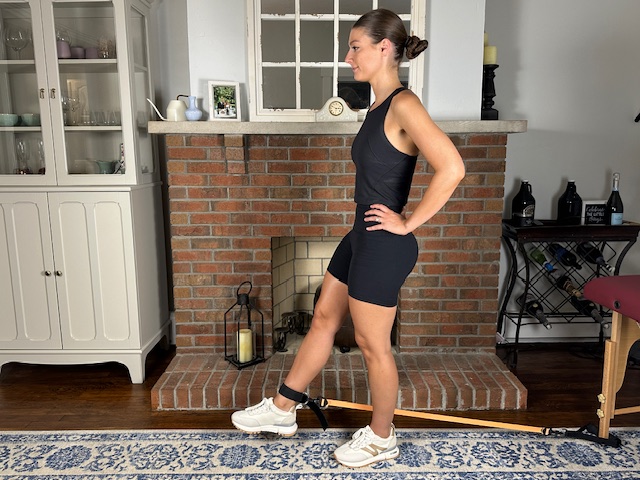
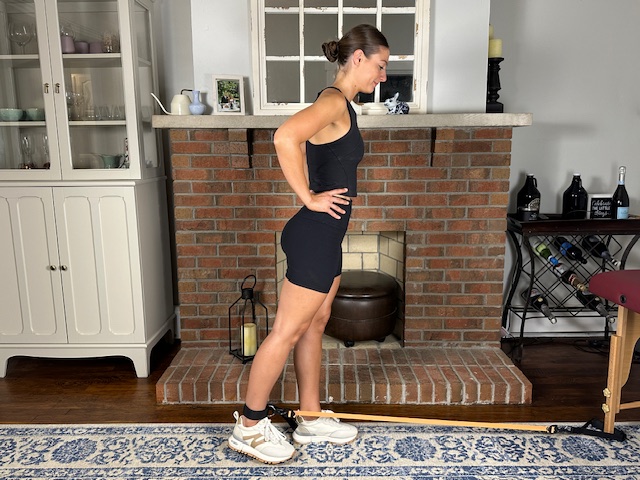
5. Steamboats
How to perform the steamboat exercise for ankle instability.
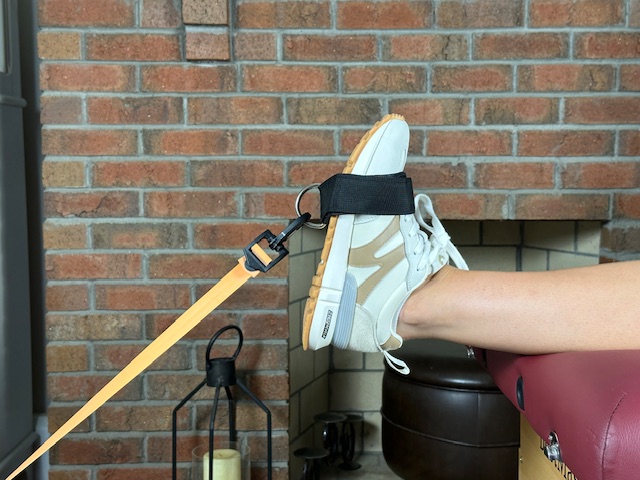
First you need to find a place to secure your band inside your home. It is best if your band can be secured lower to the ground to best challenge your balance. Sometimes finding a place to attach your band can be the trickiest part of this exercise. We recommend a sturdy table leg or a solid post in your house that will not move or slide as you begin the exercise.
Next, begin by placing the band around the unaffected ankle or the ankle without pain. You will then stand on the hurting (affected) ankle and pull the opposite ankle away from your anchored band. You will repeat this exercise in four directions including hip flexion, hip extension, hip abduction and hip adduction. The key to this exercise is to always pull the foot and leg in the direction opposite of the band to challenge your balance in several different directions or planes. For each direction repeat this movement for twenty repetitions.
Professional Tip: This exercise can be confusing at first. The key is to pull in the direction opposite of where the band is anchored as you continue to change positions. Additionally, we encourage our patients to perform this exercise pulling the band quickly with the knee straight, so you get the extra balance challenge.
However, as you are first learning this exercise, it is ok to step down with the moving leg in between repetitions if this is too challenging to perform all twenty repetitions in a row.
Additionally, although the goal of this exercise is to challenge your balance, you may feel muscles working in your hip in the leg you are standing on, as well as in your moving leg.
5a. Steamboats-Hip Flexion with Resistance Band
Once the band has been secured around your ankle, you will stand with your back to the band. Quickly pull the foot forward twenty times to challenge your balance of the standing leg, keeping your opposite knee straight
5b. Steamboats- Hip Extension with Resistance Band
For this exercise, you will stand facing the band and quickly pull the foot into hip extension or backwards away from the band.
5c. Steamboats- Hip Abduction with Resistance Band
For this exercise the band will be to your left or right depending upon which side is affected. You will then pull outwards away from the body quickly twenty times. With this exercise you are pulling the unaffected foot away from the body and your standing foot.
5d. Steamboats- Hip Adduction with Resistance Band

Lastly, you will again have the band to your left or right depending upon your hurting ankle and you will pull the band quickly across your body crossing over the standing leg.
Best equipment for steamboats
For this exercise we use the same band kit we use above for the ankle band 4-way. We like this kit because it comes with a strap to attach the band to your sturdy anchor and a few levels of resistance, so you can increase the difficulty as the exercise gets easier. The recommended band kit can be found in the link below.
Final Thoughts on Exercises for Ankle Instability
You now have our complete guide in what we have found to be most effective in quickly improving our patients’ ankle pain from home. Incorporating a combination of strength and balance training is essential in retraining your ankle to adapt and function at its best under a variety of circumstances. Additionally, it is helpful to continue to progress these exercises as they become easier to challenge the muscles in your foot and ankle especially if you are returning to sport-related or recreational activities.
We hope these exercises, tips and tricks get your ankle feeling less painful, stronger, and help you to feel more confident in your favorite activities without the worry of potentially rolling your ankle!
Frequently Asked Questions About Ankle Instability Exercises
Ankle instability is most commonly caused by previous ankle sprains that did not fully heal. Repeated sprains can stretch or weaken the ligaments and reduce muscle strength and balance, making the ankle more likely to “give way.”
Yes. A structured exercise program that focuses on strengthening, balance, and proprioception can significantly improve ankle stability. Many people are able to reduce pain, prevent repeated sprains, and return to normal activity without surgery.
Most strengthening and balance exercises for ankle instability should be performed once daily, especially in the early stages of rehab. Consistency over several weeks is key to improving ankle control and stability.
Many people begin noticing improvements within 4–6 weeks, but full stability may take longer depending on severity, consistency, and prior injuries. Balance and strength often continue improving for several months.
Mild muscle soreness or fatigue is normal, especially early on. Exercises should not cause sharp pain, swelling, or a feeling that the ankle is about to give out. If symptoms worsen, the program may need to be adjusted.
Most people can improve with a guided home exercise program, while others benefit from in-person physical therapy for progression, form correction, and sport-specific training. A home program is an easy starting place and sometimes is all that is needed, but a physical therapist can help prescribe individualized advice for your specific situation.
Additional Queries Patients Ask About Ankle Instability Exercises
I generally recommend not wearing an ankle brace during the physical therapy exercise routine. These are designed to teach the body to learn to create its own stability. An ankle brace may provide support early on outside of therapy exercises, especially during higher-risk activities. As strength and balance improve, reliance on bracing is often reduced.
Theses exercises are designed for more chronic ankle instability. Some exercises may be appropriate early, while others should wait until swelling and pain improve. Always follow your provider’s guidance after an acute injury.
Both are important. Strength builds support, while balance retrains coordination and control. The best results come from combining both.
Yes. Ongoing maintenance exercises can help prevent recurrence, especially for people with a history of repeated sprains.
Why trust Physical Therapy Simplified for exercises for Ankle Instability
At Physical Therapy Simplified, our mission is to provide an easily accessible and highly reputable source of physical therapy information that anyone can understand, follow, and benefit from. We want you to feel confident that you are getting the best content and information that will help to reduce your pain and restore you to your highest functional potential.
The author of this article, Erica Harkins, is a licensed physical therapist and received her Doctor of Physical Therapy degree from the University of Pittsburgh. She is an expert in the field of physical therapy and specializes in treating orthopedic conditions throughout the entire body.
Erica has had multiple internships in outpatient orthopedic clinics and currently works at the University of Pittsburgh Medical Center, Rehabilitation Institute. She has significant experience working with patients who have ankle instability. The treatments in this article were created by Erica and have been used on multiple patients to alleviate symptoms caused by ankle instability.