Updated on January 29, 2026
Quick Guide: 6 Best Exercises for Gluteal Tendinopathy

- Stretches the iliotibial band on the outside of your thigh
- Hold this stretch for 15 seconds and repeat 5 times
- Complete 1 set and perform 2 times per day
- Best Stretching Strap in the link below
- Stretches the piriformis muscle deep in your buttock
- Hold this stretch for 15 seconds and repeat 5 times
- Complete 1 set and perform 2 times per day
- Best Yoga Mat in the link below
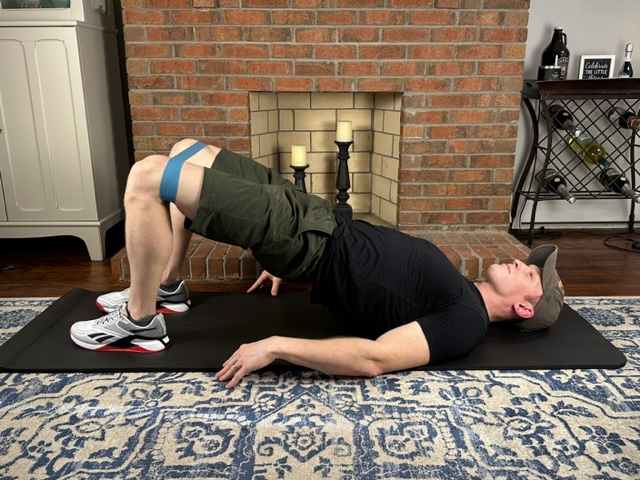
- Strengthens gluteal muscles in your butt and on the side of your hip
- Hold the top position for 3 seconds and repeat 20 times
- Complete 1 set and perform 2 times per day
- Best Resistance Bands in the link below

- Strengthens the gluteal muscles on the side of your hip
- Hold the knees apart for 3 seconds and repeat 15 times
- Complete 1 set and perform 2 times per day
- Best Resistance Bands in the link below
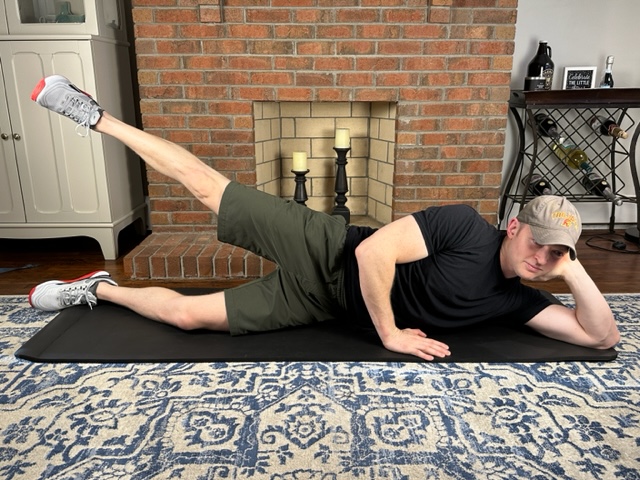
- Strengthens the gluteal muscles on the side of your hip
- Lift your leg straight toward the ceiling 10 times
- Complete 2 sets and perform 1 time per day
- Best Massage Table to do your exercises on in the link below
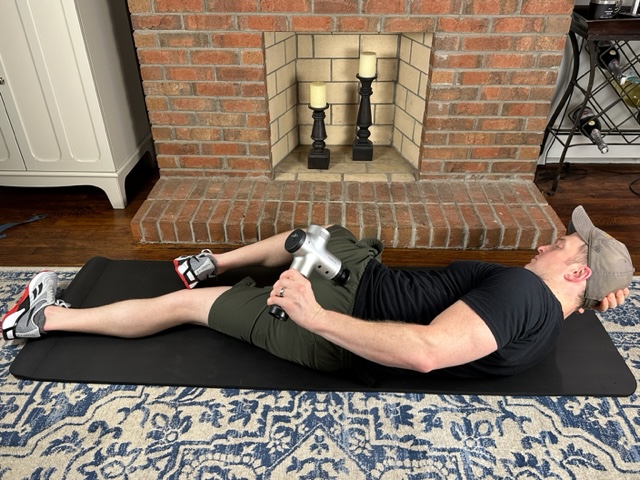
- Relaxes your gluteus medius muscle on the side of your hip
- Use the massage gun on all of the soft tissues on the side of your hip and buttock
- Complete 3 minutes of massage and perform 2 times per day
- Best Massage Gun in the link below
Disclaimers and Disclosures: All information in this article is for informational and educational purposes only and should not be taken as individual medical advice. Additionally, this article contains affiliate links, meaning when you make a purchase, we make a small commission at no additional cost to you. For more information, see our full Disclaimers and Disclosures.
Intro: Are you looking for the best exercises to treat gluteal tendinopathy?
If you are looking for the best exercises to treat gluteal tendinopathy and relieve your hip pain, then you are in the right place! There are several causes of gluteal tendinopathy, but once it sets in, it can be very difficult to get rid of. The pain on the outside of your hip can be extremely annoying and interfere with your daily routine and the fun activities you enjoy doing. Luckily, we have the solution for you.
Gluteal tendinopathy is something that I treat on nearly a daily basis in my role as an orthopedic specialist in physical therapy. Because of this, I have created a comprehensive list of exercises and treatments that are required to help heal gluteal tendinopathy. I want to make sure that you leave here feeling like you know exactly what to do and how to perform the exercises for gluteal tendinopathy that will alleviate your hip pain.
In this article, I will cover some background information on gluteal tendinopathy. Then, I will give you a detailed breakdown of the most important stretching and strengthening exercises for gluteal tendinopathy. I have provided pictures of the exercises and an in-depth description of how to perform them, including professional tips based on my experiences in the clinic. Additionally, for your convenience I have included links to the best equipment for treating gluteal tendinopathy, all of which we use with our patients in the clinic.
And then be sure to stick around at the end of the article for our most frequently asked questions about treating gluteal tendinopathy. If you’re looking to get started right away, then check out our quick guide to the best exercises for gluteal tendinopathy directly above, and then scroll later in the article for the in-depth explanation of how to perform them.
What is gluteal tendinopathy?
Gluteal tendinopathy is a condition involving the muscles and tendons on the side of the hip, which causes pain and discomfort in the area. Specifically, the structure involved is the tendon of the gluteus medius muscle, which extends from the pelvis to the lateral hip bone (greater trochanter).
Gluteal tendinopathy is especially common in middle aged and older women, but anyone can get it. Due to the location of symptoms, this condition is often confused with greater trochanteric bursitis. Consequently, it is important to determine which condition you have in order to start the best treatment program.
What causes gluteal tendinopathy?
There are several factors that can cause gluteal tendinopathy including:
- weak hip muscles
- tight hip muscles
- overuse
- compression to the area.
Weak hip muscles are unable to properly support the hip and dissipate the forces around the joint. Tight hip muscles increase the tension and forces on the tendons which leads to strain in the area. Overuse with activities such as walking, running, gardening, and hiking create cumulative trauma to the tendon when the muscles aren’t strong enough.
Compression to the area can be a result of a single event such as a fall on your hip or getting hit in the area. However, more commonly gluteal tendinopathy will develop due to sustained compression to the area. This can be from prolonged sitting, such as in a desk chair or with your legs crossed. Finally, sometimes it can be from lying on that side when you are sleeping if your mattress is too firm.
How do I know I have gluteal tendinopathy?
The hallmark of gluteal tendinopathy is pain on the side of your hip that is generally worse with activities such as walking, stair climbing, and squatting. Typically, the tendon is tender and painful when you push on it, just behind its attachment to the hip bone. This is in contrast to trochanteric bursitis, where the pain will be more directly over the bone or just beneath it.
Additionally, you may have pain on your involved side when you are standing on one leg for a prolonged period or if you lie on your side on a firm surface. The gold standard for diagnosing gluteal tendinopathy is an MRI or an ultrasound, but it is generally not necessary if the above symptoms are confirmed.
How do I treat gluteal tendinopathy?
The first step to treating gluteal tendinopathy is to limit the activities that are causing your pain and symptoms. These activities are aggravating the tissues in the area, which will worsen your symptoms and extend the healing time. By reducing your activity level and removing the pressures to the area, you will provide an opportunity for the tissue to heal.
The second step is to begin a high-quality exercise program such as the one described below. The purpose of the exercises are to stretch out the tight tissues and strengthen the surrounding musculature. Initially, you should begin the exercises with light resistance and gentle stretching. Then, over time you can progress the intensity of the exercises, which will stimulate the tissues to grow back stronger.
The final step is a gradual return to the activities that you want to do. Where many people go wrong is to jump back into their pre-injury activity level once they have progressed through their exercises and are pain-free. Instead, start with 5-10 minutes of the activity and slowly progress so your tissues have a chance to adapt to the demand that is being placed on them.
One additional note, if you think your diet may be lacking, be sure to check out our article on vitamins and supplements that are beneficial for treating gluteal tendinopathy.
In-Depth Descriptions: The Best Physical Therapy Stretches and Strengthening Exercises for Gluteal Tendinopathy
Stretching Exercises for Gluteal Tendinopathy
The best stretching exercises for gluteal tendinopathy are the hamstring stretch, piriformis stretch, ITB stretch, and prone quad stretch. These stretches should be performed two times per day, every single day for eight weeks or until your symptoms resolve.
1. Hamstring Stretch

How to perform the hamstring stretch with a strap exercise for gluteal tendinopathy.
Start by lying on your back with both legs straight and the strap around the middle of your foot. Keep your knee straight and use the strap to pull your leg straight up until you feel a stretch in the back of your leg. Once you feel the stretch, hold it for 20 seconds and then lower back down to the start position. Rest for a second or two and repeat this 5 times.
Professional tips: Having a slight bend in your knee is ok to start out. But as your body gets used to this stretch, you should work to keep your knee as straight as possible.
What is the best strap for the hamstring stretch exercise?
The Stretch Out Strap is the best option for several reasons. It is 6 feet long and has multiple loops and handles all along its length, so it is good for people of different sizes and allows you to get the most comfortable grip. It is also very durable and we have had thousands of patients use it in our clinic and most of them end up buying one for their own use at home. The Stretch Out Strap can be found in the link below.
2. Piriformis Stretch

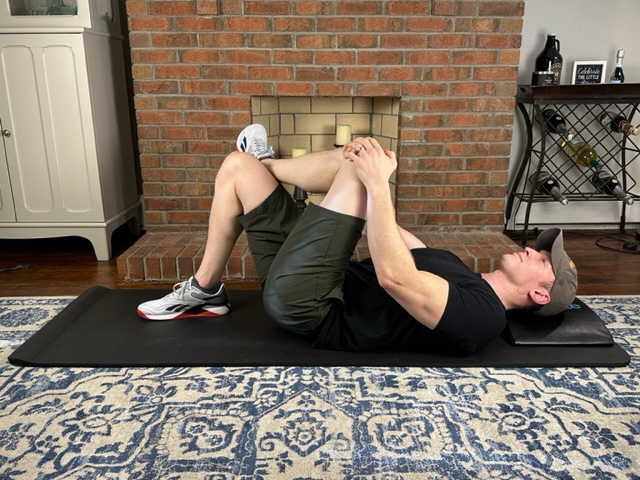
How to perform the piriformis stretch exercise for gluteal tendinopathy.
Begin by lying on your back with both knees bent, and feet flat on the floor or table. Place your ankle of your affected leg across your opposite knee, to make a figure 4 position. Then, pull your knee toward your chest until you feel a stretch in the back of your bum and thigh. Hold this stretch for 15 seconds and then relax back to the start position. Rest for a second or two and repeat this 5 times.
Professional tips: If the above position is not providing a strong enough stretch, you may reach under your planted leg and pull your thigh towards your chest. Either variation of this stretch is appropriate, feel free to alternate positions to target different areas.
What is the best equipment for performing the piriformis stretch?
The piriformis stretch requires little to no equipment! However, it is nice to have a firm but soft surface to perform this stretch on. A thick yoga mat is an easy solution to this problem and I use one for my stretches at home. You can easily roll it up and store it in a corner or even throw it in your trunk for when you are traveling. The Yoga Mat can be found in the link below.
Also, we often hear from patients, the bed does not provide a firm enough surface, but getting up and down from the ground can be challenging. To find a happy medium, a massage table that is easy to set up and stow away when you are not using it can provide a firm and higher surface to do this exercise, as well as all of your other lying down exercises. The Massage Table can be found in the link below.
3. ITB Stretch

How to perform the ITB (iliotibial band) stretch with a strap exercise for gluteal tendinopathy.
Begin by lying on your back with both knees straight and the strap around the middle of your foot. Keep your knee straight and lift your leg off the table and across your body over your opposite leg. You should feel the stretch on the outside of your hip and possibly down the side of your thigh. Once you feel the stretch, hold this position for 15 seconds and then lower back down to the start position. Rest for a second or two and repeat this 5 times.
Professional tips: If this exercise is causing groin pain, you can modify your position by lifting your leg higher, lower, or not pulling the leg as far across your body. The key is to feel a stretch on the outside of your hip or thigh without causing pain on the inside of your hip or groin region.
What is the best equipment for performing the ITB stretch with a strap?
The Stretch Out Strap is also the best option for this stretch as well. It has great utility and can be used for over 20 different stretches that we commonly have patients perform. There is also a version of this strap that is about a foot longer, the Stretch Out Strap XL, and it works well for people taller than 5’10’’. The Stretch Out Strap can be found in the link below.
4. Prone Quad Stretch

How to perform the prone quad stretch with a strap exercise for gluteal tendinopathy.
Start by lying on your stomach and loop the strap around your foot. Gently pull on the strap and bend your knee until you feel a stretch on the front of your thigh and knee. Once you feel the stretch, hold it there for 10 seconds and then relax your leg back to the start position. Perform 10 repetitions.
Professional Tip: If you need an even better stretch, roll up a thick towel or pillow and place it under your knee and then perform the stretch as described above. You should feel an even stronger stretch on the front of your thigh when you do it like this.
What is the best strap for the prone quad stretch exercise?
The Stretch Out Strap is the best equipment for performing the prone quad stretch. You can create a lasso by looping one end of the strap through the last loop in the strap. Then tighten the lasso around the middle of your foot before lying on your stomach. This makes it easy to grab onto and it gives you plenty of length and leverage to feel a good stretch on the front of your thigh. The Stretch Out Strap can be found in the link below.
Bed/Lying Down Strengthening Exercises for Gluteal Tendinopathy
The best lying down strengthening exercises for gluteal tendinopathy are bridges, sidelying clams, and sidelying abduction. These exercises should be performed two times per day, every single day for eight weeks or until your symptoms resolve.
1. Bridges with a Band

How to perform the bridge exercise for gluteal tendinopathy.
Begin lying on your back with both knees bent and feet planted on the table or floor. Lift your hips toward the ceiling and squeeze your bum at the top position. Hold this position for 3 seconds and then lower back down to the start. Perform 10 repetitions, take a 30 second break, and repeat for 2 sets.
Professional tip: It is normal to feel this exercise in your back, butt, hamstrings, and even quads. However, we want the primary mover to be your buttock, so make sure to “squeeze your cheeks” in that top position.
Once you have become accustomed to this exercise after about a week, you can add a resistance band to increase the difficulty. Place the band just around your knees and as you lift your hips off the table, gently push your knees apart to create a bit of tension on the band.
What is the best equipment for performing the bridge.
A loop resistance band is the easiest way to increase the effectiveness of this exercise. You can simply slide the band over your feet and move it up to position it just above your knees. The band increases the amount of muscle recruitment, which will make your hips and butt stronger. As an added benefit, this will make your booty pop! The Loop Resistance Bands can be found in the link below.
2. Sidelying Clams

How to perform the sidelying clams exercise for gluteal tendinopathy.
Begin lying on your side with the affected (hurting) hip facing the ceiling and both knees bent. Keep your feet together and lift the top knee toward the ceiling, pause for 3 seconds and then return to the starting position. Perform 10 repetitions, take a 30 second break, and repeat for 2 sets.
Once this exercise begins to feel too easy, add a resistance band around your knees to increase the challenge. The addition of a resistance band will help to improve your gluteus medius strength quicker.
Professional tip: When you are lifting the top leg, make sure to keep your hips in place and avoid opening the legs so far that you rock backwards. The goal is to feel the burn and fatigue on the outer side of the hip and bum.
What is the best equipment for performing the sidelying clams?
The same loop resistance bands we used for the bridge exercise can be used for the sidelying clams as well. Having a few of these bands with variable resistances is great because you can change and add resistance as you gain strength every couple of weeks. A progressive overload to the tendon and muscle is the best way to get it ready to return to higher level activities. The Loop Resistance Bands can be found in the link below.
3. Sidelying Abduction

How to perform the sidelying hip abduction exercise for gluteal tendinopathy.
Begin by lying on your side with your affected (hurting) hip facing the ceiling. First, bend the knee that is lying on the floor and straighten your top leg. Keep your knee straight and lift the top leg toward the ceiling until you feel a squeeze on your outer hip, then lower your leg back to the starting position. Perform 10 repetitions, take a 60 second break and repeat for 2 sets.
Professional tip: Lifting the leg higher is not necessarily better. The intent of this exercise is to feel a squeeze on the outside of your hip and bum. I tell my patients to keep their hips/pelvis rolled forward and their leg back.
What is the best equipment for performing the sidelying hip abduction?
You can perform this exercise on the floor or on your bed. However, most of my patients say that their floor is too hard and the bed is too soft. So, I recommend a thick yoga mat if you prefer doing your exercises on the floor or a massage table if you prefer not to get up and down from the floor. The Yoga Mat can be found in the link below.
I have found the best and most economical options for each of these. In fact, they are the same ones that my wife and I use at home, so I know they work great! The Massage Table can be found in the links below.
Standing Strengthening Exercises for Gluteal Tendinopathy
The best standing strengthening exercises for gluteal tendinopathy are step-downs, ball against wall, and sidesteps with a band. These exercises should be started 2-3 weeks after starting the lying down exercises. You should perform these exercises one time per day, every single day for eight weeks or until your symptoms resolve.
1. Step-Downs
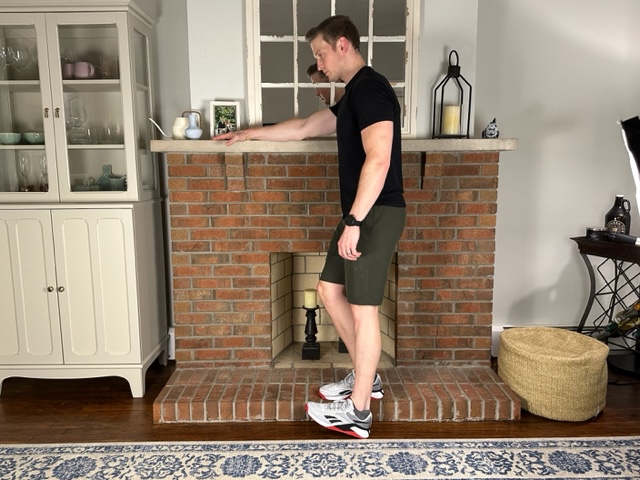
How to perform the step-down exercise for gluteal tendinopathy.
Start by placing a small step next to your counter or other stable surface. Hold on to the counter and stand on the stepper with your affected leg. Slowly bend your knee and lower the opposite heel to the ground. I like to tell my patients, “pretend there is a potato chip on the ground that you want to touch with your heel, but not crack”. Then stand back up to the start position. Repeat 10 times, take a 30 second break, and complete 2 sets.
Professional tips: Start with a 4-inch step height when you begin this exercise. Once you can perform all the repetitions without pain and with relative ease, increase the step height by 2 inches. A normal height step is 8 inches, so I have my patients work toward this goal.
What is the best stepper for performing the step-down exercise?
For the step-down exercise, you will want a stepper that is adjustable and that has good traction. The stepper below is nonslip and allows for variable heights so you can progress as your symptoms permit. This stepper is great because of its versality and the number of exercises you can do on it. We have hundreds of patients do dozens of different exercises on them, so they come in pretty handy. The Stepper can be found in the link below.
2. Ball Against Wall
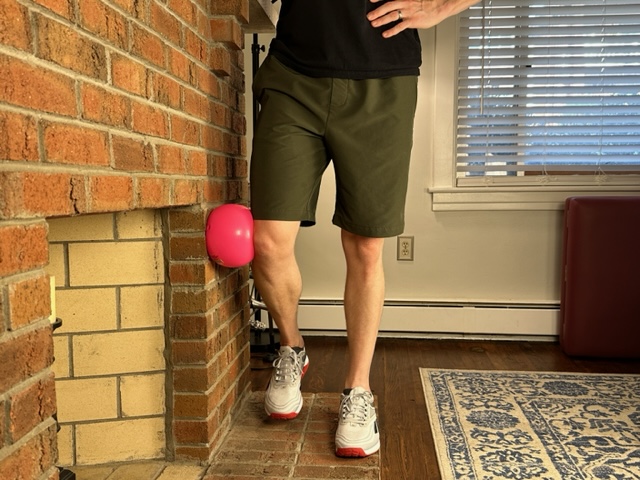
How to perform the ball against wall exercise for gluteal tendinopathy.
Start by standing next to your counter or a wall with a therapy ball placed on the outside of your knee, against the wall. Hover your foot (the leg that is contacting the ball) an inch off the ground and press that leg into the ball. Hold for 5 seconds and then relax and complete 15 repetitions. Then turn the opposite way and complete another 15 repetitions with your other leg.
Professional Tip: Stand tall and try not to lean to the side, you should feel tension on the outside of the hip of the leg you are standing on. You can start by holding on to the counter or the wall at first, but expert level is doing this exercise without holding on!
Also, don’t forget that the leg that is in contact with the ball is the one you are hovering off the ground and pressing into the wall. I have seen quite a few patients get turned around with this exercise and use the wrong leg.
What is the best equipment for performing the ball against wall exercise?
You can do the ball against wall exercise with a soccer ball, basketball, or even a pillow. But the best equipment is a therapy ball. This ball is soft on your knee and also creates just a little bit of instability as you press into it, which makes the exercise more effective. Also, you can use the therapy ball for other exercises that you may do another time. The Therapy Ball can be found in the link below.
3. Sidesteps with a Band
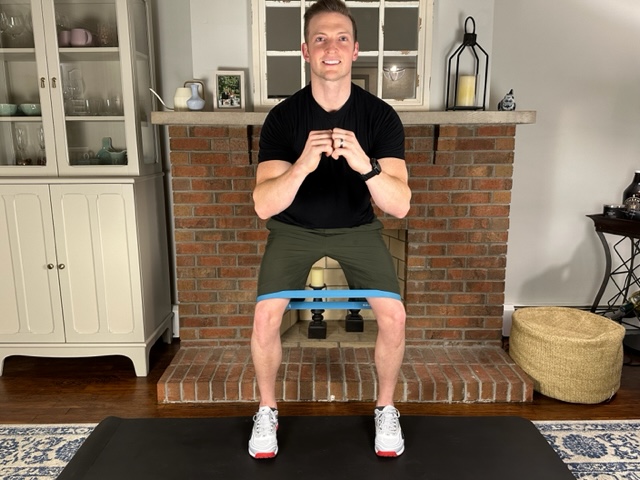
How to perform the sidesteps with a band exercise for gluteal tendinopathy.
Start by standing with a resistance band looped around your thighs, just above your knees. Bend your knees slightly so you are in a mini squat position and press your knees apart, so you are always keeping tension on the band. Make sure to keep your toes pointed forward and slowly step sideways, always keeping a space between your feet.
Take 15 steps in one direction, stay facing the same way, and then take 15 steps back to the start position. Take a 15 second break and repeat 3 times.
Professional Tip: This exercise is designed to make you feel a bit of a burn in your hips, thighs, and buttock. Start with a light resistance band and once you can get through all 3 sets with relative ease, it’s time to increase the tension of the resistance band.
What is the best equipment for performing the sidesteps with a band exercise?
The best equipment for the sidesteps with a band exercise is a set of loop resistance bands that are easy to put on and take off. You will want a set of these bands so you can start with low resistance and slowly increase the tension of the band as you get stronger. The Loop Resistance Bands can be found in the link below.
Mobility Exercises for Gluteal Tendinopathy
The best mobility exercises for gluteal tendinopathy are foam rolling, a lacrosse ball, and a massage gun. You don’t necessarily have to do all three of these exercises, this is more of a pick the best option for you scenario. Whichever one you choose, I recommend performing 3-5 minutes of the mobility exercises two times per day for the best results.
The foam roller is the gentlest option but sometimes it can be difficult to truly target the area directly around the hip that needs mobilized. The lacrosse ball is the most effective in my opinion, but it’s also the most uncomfortable and difficult to perform. The massage gun takes the least amount of effort, is the easiest to use, and you can target the area effectively.
Each mobility device has its own pros and cons, so choosing can be difficult. However, these are my favorite three mobility devices and I use them to mobilize different tissues from head to toe. I recommend getting all three and you can keep them handy for whenever the need arises.
1. Foam Roll
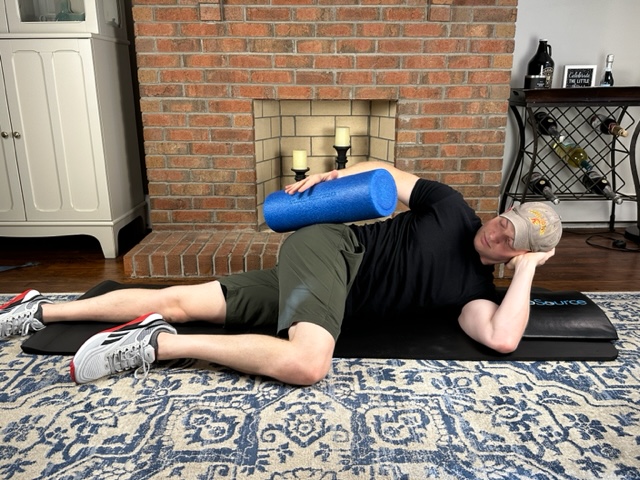
How to foam roll the gluteus medius muscle for gluteal tendinopathy.
Start lying on your good side with a pillow between your knees. Roll the foam roller all around the muscles and soft tissues on the outside of your hip. Target the painful area just behind the bony prominence on the side of your hip. Perform 3-5 minutes of rolling and complete 2 sessions per day.
Professional tips: Having a friend or family member help you with this exercise can be really beneficial. You can relax and guide them to the tender area and give them feedback on how much pressure to use. Just remember that massages aren’t a one way street, make sure to help them with their mobility work as well!
What is the best equipment for the foam roll mobility exercise?
There are many options of foam rollers on the market, but this one is our favorite. We love it because it is simple but effective. It is sturdy enough to sit or lie on, but not so stiff that that it’s too uncomfortable to use. We also like this foam roller because it is smooth with no nubby pieces which makes this mobilization more tolerable. The Foam Roller can be found in the link below.
2. Lacrosse Ball
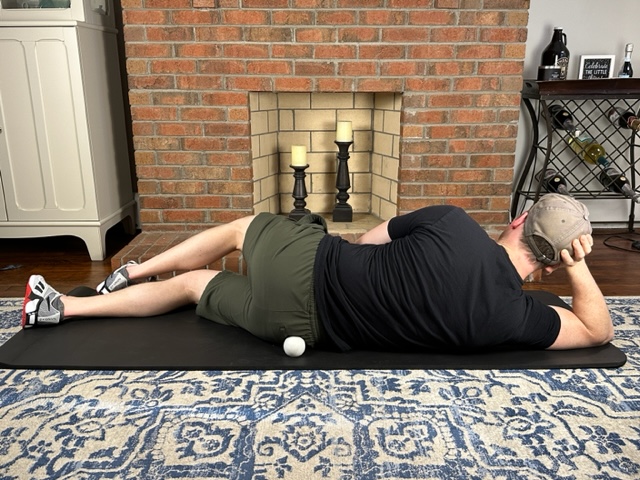
How to perform the lacrosse ball mobility exercise for gluteal tendinopathy.
Start lying on your hurting side with a lacrosse ball under you and pinned against the muscles on the side of your hip. Slowly rock over the lacrosse ball so it rolls over the muscles in the area. Work the ball into all of the muscles in the area but stay off of the bony prominences. Take deep breaths to try and get the muscles to relax. Perform 3-5 minutes of this and complete 1-2 times per day.
Professional tips: This mobilization can be extremely tender so it may help to start with a tennis ball which is a little more forgiving. Then, as you gain experience, you can graduate to the lacrosse ball, just make sure it is always tolerable and not causing too much discomfort.
What is the best equipment for the lacrosse ball mobility exercise?
There are more and more mobility ball devices coming on the market every day. However, a good old fashioned lacrosse ball always gets the job done for me and is one of my favorite pieces of mobility equipment. As an added bonus, the lacrosse ball is the cheapest option of these devices on the market. The Lacrosse Ball can be found in the link below.
3. Massage Gun

How to perform the massage gun mobility exercise for gluteal tendinopathy.
Start lying on your good side with a between your knees. Turn on the massage gun to the lowest setting and start working into the muscles around your hip. Slowly move back and forth over all the muscles in the area and be sure to stay off of the bony prominences. Take deep breaths to try and get the muscles to relax. Perform 3-5 minutes of this and complete 1-2 times per day.
Professional tips: I like to perform a few slow sweeps of the whole area and then once a find spot that is a little more tender, I’ll spend 30 seconds doing small circles on that spot. You can also try different settings and different attachments to see which ones feel best for you.
What is the best equipment for the massage gun mobility exercise?
We have found the Hyperice Hypervolt to be our favorite massage gun. We like the Hypervolt because it is easy to use, has multiple settings, multiple massage head attachments and does a great job of working into the muscles. We have also had our Hypervolt for a few years and it is very reliable and versatile! We charge it every few days or weeks depending on how often we are using it, and the battery lasts as long as we need it to! The Hypervolt Massage Gun can be found in the link below.
Final Thoughts: Best Gluteal Tendinopathy Exercises
You now have the complete guide for treating your gluteal tendinopathy from home. The first step is to reduce the activities that are aggravating your symptoms. Then, get started on the stretching and strengthening exercises from above, and make sure to be diligent and perform them most, if not every day. Gradually add resistance to the exercises and increase the difficulty as your symptoms permit. Finally, slowly progress back into the activities that you love to do!
Frequently Asked Questions About Treatments and Exercises for Gluteal Tendinopathy
Gluteal tendinopathy can take several months to fully resolve if left untreated. With a structured physical therapy exercise program focused on progressive strengthening and load management, many people experience significant improvement within 6–12 weeks.
Gluteal tendinopathy often worsens with prolonged compression or overuse of the tendon. Common aggravating factors include sitting with legs crossed, lying on the painful side, long walks or runs, repeated stair climbing, and prolonged bending activities such as gardening.
Oral and topical anti-inflammatory medications may provide short-term pain relief but do not improve long-term tendon healing. They are best used sparingly and under medical guidance to help tolerate activity or exercise during flare-ups.
Sleeping on your back with a pillow under your knees or on your non-painful side with a pillow between your knees can reduce pressure on the affected hip. If side-lying is unavoidable, a softer surface or mattress topper may help decrease compression on the tendon.
Additional Queries Patients Ask About Gluteal Tendinopathy
There are three main trigger points with gluteal tendinopathy:
- the gluteus medius muscle
- the pifirformis muscle
- the tensor fascia lata muscle
Use a lacrosse ball or massage gun to work into these three trigger points as described above. This will help to reduce the tension in these muscles which will improve your pain and symptoms over time.
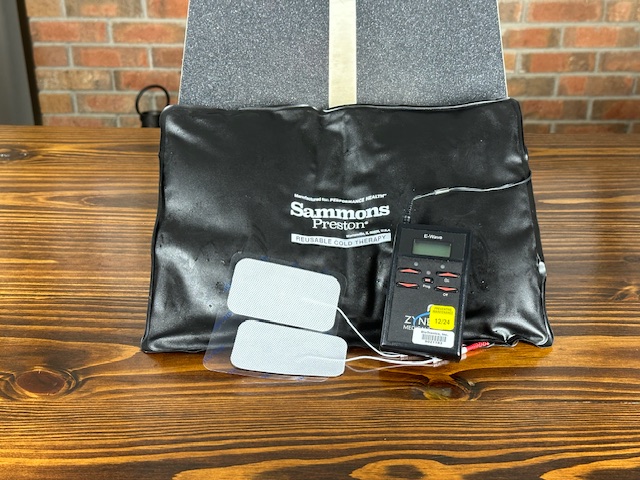
Ice or heat can be a helpful, short-term remedy to the pain associated with gluteal tendinopathy. Neither of these provide long-term benefits for healing gluteal tendinopathy. However, we will often use both of these modalities in the clinic to reduce the discomfort in the area. I like to combine ice with TENS for maximal pain relief and to reduce any inflammation in the area.
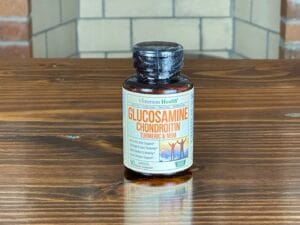
Some supplements may help support tendon healing, including vitamin C, glucosamine and chondroitin, curcumin, and L-arginine, though research is still limited. Supplements should be used to support a structured rehabilitation program — not replace exercise.
For a full evidence-based breakdown of supplements that may support tendon healing, including dosing and safety considerations, see our complete guide here:
Best Vitamins and Supplements for Guteal Tendon Healing
Why you can trust Physical Therapy Simplified for treatments and exercises for gluteal tendinopathy.
At Physical Therapy Simplified, our mission is to provide an easily accessible and highly reputable source of physical therapy information that anyone can understand, follow, and benefit from. We want you to feel confident that you are getting the best content and information that will help to reduce your pain and restore you to your highest functional potential.
The author of this article, Andrew Harkins, DPT, has demonstrated expertise in the field of physical therapy and is certified by the American Board of Physical Therapy Specialities as an Orthopedic Clinical Specialist. He has over ten years of experience as a licensed physical therapist and is an expert in treating conditions related to the hip.
Additionally, Andrew is a Certified Strength and Conditioning Specialist and an expert at creating exercise routines for rehabilitation as well as fitness. He is a Certified Orthopedic Manual Therapist with years of experience in soft tissue mobilizations and has successfully treated hundreds of patients with gluteal tendinopathy.
